第一章-shiro概述
学习视频:https://www.bilibili.com/video/BV1Dt411g7DZ?p=4
1什么是shiro
Apache的强大灵话的开源安全框架
认证、授权、企业会话管理、安全加密
w3c教程https://www.w3cschool.cn/shiro/skex1if6.html
过滤和shiro由来详解:https://www.cnblogs.com/jpfss/p/8352031.html
shiro的英语词汇:https://www.cnblogs.com/caohanren/p/11445295.html
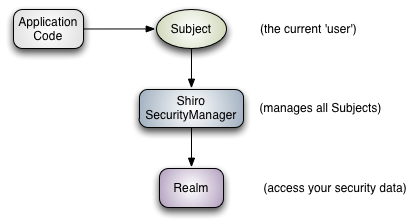
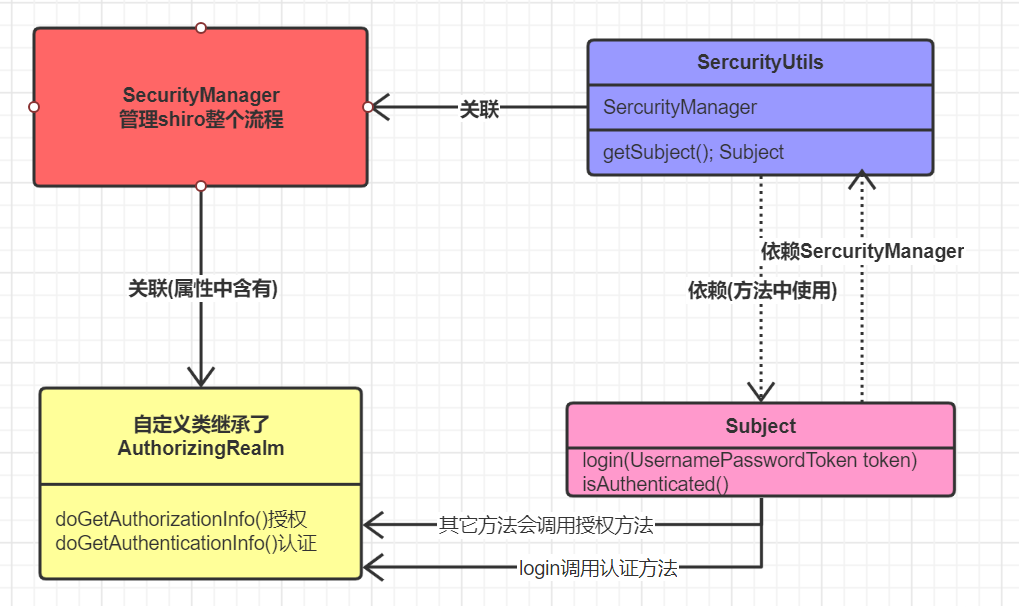
Subject:主体,代表了当前 “用户”,这个用户不一定是一个具体的人,与当前应用交互的任何东西都是 Subject,如网络爬虫,机器人等;即一个抽象概念;所有 Subject 都绑定到 SecurityManager,与 Subject 的所有交互都会委托给 SecurityManager;可以把 Subject 认为是一个门面;SecurityManager 才是实际的执行者;
SecurityManager:安全管理器;即所有与安全有关的操作都会与 SecurityManager 交互;且它管理着所有 Subject;可以看出它是 Shiro 的核心,它负责与后边介绍的其他组件进行交互,如果学习过 SpringMVC,你可以把它看成 DispatcherServlet 前端控制器;
Realm:域,Shiro 从从 Realm 获取安全数据(如用户、角色、权限),就是说 SecurityManager 要验证用户身份,那么它需要从 Realm 获取相应的用户进行比较以确定用户身份是否合法;也需要从 Realm 得到用户相应的角色 / 权限进行验证用户是否能进行操作;可以把 Realm 看成 DataSource,即安全数据源。
也就是说对于我们而言,最简单的一个 Shiro 应用:
- 应用代码通过 Subject 来进行认证和授权,而 Subject 又委托给 SecurityManager;
- 我们需要给 Shiro 的 SecurityManager 注入 Realm,从而让 SecurityManager 能得到合法的用户及其权限进行判断。
从以上也可以看出,Shiro 不提供维护用户 / 权限,而是通过 Realm 让开发人员自己注入。
2快速开始
找到shiro的官网https://github.com/apache/shiro 跳转Github
来到 shiro/samples/quickstart/src/main/resources/
1导入jar
 1
 2
 3
 4
 5
 6
 7
 8
 9
10
11
12
13
14
15
16
17
18
19
20
21
22
23
24
|
<!--shior安全框架-->
        <dependency>
            <groupId>org.apache.shiro</groupId>
            <artifactId>shiro-core</artifactId>
            <version>1.5.2</version>
        </dependency>

   <!-- configure logging -->
        <dependency>
            <groupId>org.slf4j</groupId>
            <artifactId>jcl-over-slf4j</artifactId>
            <scope>runtime</scope>
        </dependency>
        <dependency>
            <groupId>org.slf4j</groupId>
            <artifactId>slf4j-log4j12</artifactId>
            <scope>runtime</scope>
        </dependency>
        <dependency>
            <groupId>log4j</groupId>
            <artifactId>log4j</artifactId>
            <scope>runtime</scope>
        </dependency>
把scope和runtime去掉
|
2配置文件shiro.ini 放到resource目录下
3QuickStart(三个文件都可以在github中的shiro/samples/quickstart/src找到)
在集成SpringBoot中可以选中下面的主要方法
 1
 2
 3
 4
 5
 6
 7
 8
 9
10
11
12
13
14
15
16
17
18
19
20
21
22
23
24
25
26
27
28
29
30
31
32
33
34
35
36
37
38
39
40
41
42
43
44
45
46
47
48
49
50
51
52
53
54
55
56
57
58
59
60
61
62
63
64
65
66
67
68
69
70
71
72
73
74
75
|
private static final transient Logger log = LoggerFactory.getLogger(Quickstart.class);
public static void main(String[] args) {
        //0加载配置文件
        Factory<SecurityManager> factory = new IniSecurityManagerFactory("classpath:shiro.ini");
        SecurityManager securityManager = factory.getInstance();

        SecurityUtils.setSecurityManager(securityManager);

        // Now that a simple Shiro environment is set up, let's see what you can do:


        // 1获得当前的subject
        Subject currentUser = SecurityUtils.getSubject();

        //2获得当前用户的session Do some stuff with a Session (no need for a web or EJB container!!!)
        Session session = currentUser.getSession();
        session.setAttribute("someKey", "aValue");
        String value = (String) session.getAttribute("someKey");
        if (value.equals("aValue")) {
            log.info("Retrieved the correct value! [" + value + "]");
        }

        // let's login the current user so we can check against roles and permissions:
        //3判断当前用户是否被认证
        if (!currentUser.isAuthenticated()) {
            UsernamePasswordToken token = new UsernamePasswordToken("lonestarr", "vespa");
            token.setRememberMe(true);
            try {
                currentUser.login(token);
            } catch (UnknownAccountException uae) {
                log.info("There is no user with username of " + token.getPrincipal());
            } catch (IncorrectCredentialsException ice) {
                log.info("Password for account " + token.getPrincipal() + " was incorrect!");
            } catch (LockedAccountException lae) {
                log.info("The account for username " + token.getPrincipal() + " is locked.  " +
                        "Please contact your administrator to unlock it.");
            }
            // ... catch more exceptions here (maybe custom ones specific to your application?
            catch (AuthenticationException ae) {
                //unexpected condition?  error?
            }
        }

        //say who they are:
        //print their identifying principal (in this case, a username):
        log.info("User [" + currentUser.getPrincipal() + "] logged in successfully.");

        //4当前用户所获得的角色
        if (currentUser.hasRole("schwartz")) {
            log.info("May the Schwartz be with you!");
        } else {
            log.info("Hello, mere mortal.");
        }

        //test a typed permission (not instance-level)
        //获取当前用户权限
        if (currentUser.isPermitted("lightsaber:wield")) {
            log.info("You may use a lightsaber ring.  Use it wisely.");
        } else {
            log.info("Sorry, lightsaber rings are for schwartz masters only.");
        }

        //a (very powerful) Instance Level permission:
        if (currentUser.isPermitted("winnebago:drive:eagle5")) {
            log.info("You are permitted to 'drive' the winnebago with license plate (id) 'eagle5'.  " +
                    "Here are the keys - have fun!");
        } else {
            log.info("Sorry, you aren't allowed to drive the 'eagle5' winnebago!");
        }

        //all done - log out!
        currentUser.logout();

        System.exit(0);
    }
|
主要的Subject的方法
 1
 2
 3
 4
 5
 6
 7
 8
 9
10
11
12
13
14
|
// 1获得当前的subject
Subject currentUser = SecurityUtils.getSubject();

//2获得当前用户的session
Session session = currentUser.getSession();

//3判断当前用户是否被认证
currentUser.isAuthenticated();

//4当前用户是否拥有某角色
currentUser.hasRole("schwartz");

//当前用户是否有某个权限
currentUser.isPermitted("lightsaber:wield");
|
4在web项目中
web.xml中需要有一个shiroFilter的过滤器,然后再shiro.xml中进行配置同名的filter bean,因为shiro会去IOC容器中查找和filter-name名对应的filter bean
4URL匹配模式
URL模式使用Ant风格模式
Ant路径通配符支持?、*、** 通配符匹配不包括目录分割符号”/”
?匹配一个字符,/admin?匹配admin1,但不匹配/admin/1
*匹配0或多个字符,如/admin*匹配/admin123
**匹配路径中的0个或多个路径,如/admin/**匹配/admin/a或者admin/a/b
匹配原则:第一次匹配优先,前面若匹配成功会覆盖后面匹配
5认证(登录)
1认证步骤,在Controller登录中执行(jsp的表单)
 1
 2
 3
 4
 5
 6
 7
 8
 9
10
11
12
13
14
15
16
|
// 1获得当前的subject
        org.apache.shiro.subject.Subject currentUser = SecurityUtils.getSubject();

    // let's login the current user so we can check against roles and permissions:
    //3判断当前用户是否被认证   (会去执行Realm接口 token执行方法)
    if (!currentUser.isAuthenticated()) {
        UsernamePasswordToken token = new UsernamePasswordToken("lonestarr", "vespa");
        //remember me记住我
        token.setRememberMe(true);
        try {
        	//执行登录
            currentUser.login(token);
        } catch (AuthenticationException ae) {
            System.out.println("登录失败"+ae.getMessage());
        }
    }
|
2会跳到public class ThirdRealm extends AuthorizingRealm Realm类中执行方法
 1
 2
 3
 4
 5
 6
 7
 8
 9
10
11
12
13
14
15
16
17
18
19
20
21
22
23
24
25
26
27
28
29
30
31
32
33
34
35
36
37
|
@Override
	protected AuthenticationInfo doGetAuthenticationInfo(AuthenticationToken token) throws AuthenticationException {
		System.out.println(" AuthorizingRealm ------token认证");

		 //1把认证的authenticationToken转化为用户名密码令牌
		 UsernamePasswordToken upToken = (UsernamePasswordToken) token;

		 //2从UsernamePasswordToken取出username
		 String tokenAccount=upToken.getUsername();

		 //3从数据库取出用户名密码 ,这里方便演示。写固定
		 String username="April";
    String password="third";

		 //4若用户不存在(数据库对象为null),则可以抛出UnknowAccountException,返回null自动抛出
		 if("".equals(tokenAccount)) {
			 System.out.println("用户不存在");
			 throw new UnknownAccountException("用户不存在");//返回null自动抛出异常 UnknowAccountException
		 }

		 //5根据用户信息情况,决定是否抛出其他AccountException
		 if("monster".equals(tokenAccount)){
			 System.out.println("用户被锁定");
		     throw new LockedAccountException("用户被锁定");
		 }

		 //6根据用户情况,构建AuthenticationInfo,最常用的是SimpleAuthenticationInfo
		 //以下信息从数据库中获取的
		 //参数1 principal认证的实体信息,可以是username,也可以是数据表对应的实体对象。
    			//可在authorization方法中principals.getPrimaryPrincipal()
		 //参数2 credentials 密码,从数据库中获取的
		 //参数3 realmName 当前realmName,当前realm对象的name,调用父类的getName()
		 String realmName=getName();
		 SimpleAuthenticationInfo  authentication= new SimpleAuthenticationInfo("", password,"");
		 System.out.println("登录成功");
		return authentication;
	}
|
在第六步,构建SimpleAuthenticationInfo进行比对密码时,是shiro帮我们去完成的,可以在SimpleAuthenticationInfo的getCredentials()方法加断点,查看如何进行比对的。
可以知道是通过AuthenticatingRealm的assertCredentialsMatch方法,对CredentialsMatcher属性直接进行比对的。(但数据库里面的密码一般是加密后的密码。)
问题:登录后不跳到successUrl原因是,自动去Controller中去执行ModelAndView中的返回结果。
6MD5加密
在上面的第六步,构建SimpleAuthenticationInfo进行比对密码时,是shiro帮我们去完成的,可以在SimpleAuthenticationInfo的getCredentials()方法加断点,查看如何进行比对的。
可以知道是通过AuthenticatingRealm的assertCredentialsMatch方法,对CredentialsMatcher属性直接进行比对的。(但数据库里面的密码一般是加密后的密码。)
1如何把字符串加密为MD5。(这里是把token的密码加密为MD5)
2替换当前Realm的creadentialsMatcher属性,直接使用HashedCredentialsMatcher对象,并设置加密算法即可。
1配置文件设置 (二选一)
 1
 2
 3
 4
 5
 6
 7
 8
 9
10
11
12
|
<!--1.2 实现的realm接口  -->
   <bean id="thirdRealm" class="com.lanxin.qx.realm.ThirdRealm">
    <!-- 配置密码匹配器 -->
        <property name="credentialsMatcher">
            <bean class="org.apache.shiro.authc.credential.HashedCredentialsMatcher">
                <!-- 加密算法为MD5 -->
                <property name="hashAlgorithmName" value="MD5"></property>
                <!-- 加密次数 -->
                <property name="hashIterations" value="1024"></property>
            </bean>
        </property>
   </bean>
|
2用类设置(二选一)
1
2
3
4
5
6
|
CustomAuthorizingRealm authorizingRealm=new CustomAuthorizingRealm();
//设置证书匹配器
HashedCredentialsMatcher credentialsMatcher=new HashedCredentialsMatcher();
credentialsMatcher.setHashAlgorithmName("md5");
credentialsMatcher.setHashIterations(1024);
authorizingRealm.setCredentialsMatcher(credentialsMatcher);
|

 1
 2
 3
 4
 5
 6
 7
 8
 9
10
11
12
13
14
15
16
17
|
//查看123456使用MD5加密1024次后的值
//放入数据库
//方法1 推荐
String username="lusenlin";
String password="123456";
Md5Hash md5Hash = new Md5Hash(password, username, 1024);
System.out.println(md5Hash.toString());


//方法2
String hashAlonrithmName="MD5";
		Object credentials="123456";
		Object salt=null;//ByteSource.Util.bytes("April");//一般使用username进行加盐
		int hashIterations=1024;
		Object result=new SimpleHash(hashAlonrithmName, credentials, salt, hashIterations);
		System.out.println(result);
|
MD5盐值加密
出现原因:MD5加密的话,即使加密1024次,若密码相同,获得的MD5值也是相同的。
实现方法:在Realm的doGetAuthenticationInfo方法创建SimpleAuthenticationInfo(principal, hashedCredentials, credentialsSalt, realmName)对象。
使用ByteSource.Util.bytes()计算盐值,盐值需要唯一,一般使用username
1
2
3
|
SimpleAuthenticationInfo authentication= new SimpleAuthenticationInfo("", password,getName());
ByteSource salt = ByteSource.Util.bytes(username);
authentication.setCredentialsSalt(salt);
|
若有多种加密,比如在多个数据库中验证,每个数据库中的加密方式不同,可以创建多Realm进行验证。securityManager中添加authenticator属性
7认证策略
AuthenticationStrategy认证策略
Shiro有3中认证策略的具体实现
AuthenticationStrategy类:
AtLeastOneSuccessfulStrategy(默认)
只要一个或者多个Realm认证通过,则整体身份认证就会视为成功。
FirstSuccessfulStrategy
只有第一个验证通过,才会视为整体认证通过。其他的会被忽略。
AllSuccessfulStrategy
只有所有的Realm认证成功,才会被视为认证通过。
自定义策略:继承org.apache.shiro.authc.pam.AbstractAuthenticationStrategy。
Realm顺序对认证是有影响的(从第一个Realm到第二个Realm)
认证策略的修改也是在shiro.xml中的多Realm配置中设置。
8授权
概念
授权,也叫做访问控制,即在应用中控制谁能访问哪些资源(如访问页面、编辑数据、页面操作等)。在授权中需要了解几个关键对象:主体(Subject)、资源(Resource)、权限(Permission)、角色(Role)。
主体:
主体,即访问应用的用户,在Shiro中使用Subject代表用户。用户只有授权后才允许访问相应的资源。
资源:
在应用中用户可以访问的任何东西都称为资源。用户只有授权后才能访问。
权限:
安全策略中的原子授权单位,通过权限我们可以表示在应用中用户有没有操作某个资源的权利。即权限表示在应用中用户能不能访问某个资源。
shiro支持粗颗粒度权限(如用户模块的所有权限)和细颗粒度权限(操作某个用户的权限,即实例级别的)。
角色:
角色代表了操作集合,可以理解为权限的集合,一般情况下我们会赋予用户角色而不是权限,即这样用户可以拥有一组权限。不同的角色拥有一组不同的权限。
shiro支持三种方式的授权:编程(if/else授权代码完成)、注解(在java方法防止相应的注解,没有权限抛出异常)、JSP/GSP(页面通过相应标签完成)。
 1
 2
 3
 4
 5
 6
 7
 8
 9
10
11
12
13
14
15
16
17
18
19
20
21
22
23
24
|
public class ThirdRealm extends AuthorizingRealm {
//授权
    protected AuthorizationInfo doGetAuthorizationInfo(PrincipalCollection principals) {
        System.out.println("authorization授权方法");

        //可以获得认证传来的第一个参数
        Object primaryPrincipal = principals.getPrimaryPrincipal();
        //根据对象 进行数据库查找角色、权限
        Set<String> roles=new HashSet<String>();
        roles.add("person");
        roles.add("monster");

        Set<String> permissions=new HashSet<String>();
        permissions.add("person:producing");
        permissions.add("person:kill ");

        //对认证的主体 授权角色、权限
        SimpleAuthorizationInfo authentication=new SimpleAuthorizationInfo();
        authentication.addRoles(roles);
        authentication.addStringPermissions(permissions);

        return authentication;
    }
|
jsp标签
1
2
3
4
5
6
7
8
9
|
首先引入命名空间
<%@taglib prefix="shiro" uri="http://shiro.apache.org/tags" %>

当前登录principal<shiro:principal></shiro:principal><br>

<shiro:hasRole name="fruits">
若有fruits权限就显示
<a href="${pageContext.request.contextPath}/view/fruits.jsp">fruits水果类</a>
</shiro:hasRole>
|
权限控制一共有三种方式,1 shiro.xml中进行shiroFilter静态配置 或者 对Map进行动态添加,2 对Controller进行权限注解控制。 3jsp页面用标签进行控制。
权限注解
SSM需要在shiro/xml和spring-mvc中加入
 1
 2
 3
 4
 5
 6
 7
 8
 9
10
|
<!--shiro.xml中加入
 3.开启Spring AOC Shiro注解支持
 -->
<bean class="org.apache.shiro.spring.security.interceptor.AuthorizationAttributeSourceAdvisor">
  <property name="securityManager" ref="securityManager"/>
</bean>

<!--  springmvc中加入
开启shiro中aop注解 -->
<aop:config proxy-target-class="true"></aop:config>
|
Realm中的权限控制
 1
 2
 3
 4
 5
 6
 7
 8
 9
10
11
12
13
14
15
16
17
18
|
//1使用该注解标注的类,实例,方法在访问或调用时,当前Subject必须在当前session中已经过认证。
//即currentUser.isAuthenticated()=true
@RequiresAuthentication

//2表示当前Subject已经身份验证或者通过记住我登录的
@RequiresUser

//3使用该注解标注的类,实例,方法在访问或调用时,
//当前Subject可以是“gust”游客身份,不需要经过认证或者在原先的session中存在记录。
@RequiresGuest:

//4表示当前需要fruits角色,若数组中是{"fruits","user"}
//则需要两个角色,若Logical.OR则说明只需要一个
@RequiresRoles(value={"fruits"}, logical= Logical.AND)

//5表示当前Subject需要权限当前Subject需要user:b或者user:a权限
//如果当前Subject不具有这样的权限,则方法不会被执行。
@RequiresPermissions(value={"user:a","user:b"}, logical= Logical.OR)
|
动态权限管理
进行权限管理时,一般都是通过查询数据库进行配置的。
shiro.xml中配置
 1
 2
 3
 4
 5
 6
 7
 8
 9
10
11
12
13
14
15
16
17
18
19
|
<!-- 4配置shiroFilter ,Id必须和web.xml中的delegatingFilterProxy的<fileter-name>一致  -->
<bean id="shiroFilter" class="org.apache.shiro.spring.web.ShiroFilterFactoryBean">
<property name="unauthorizedUrl" value="/login/unAuthorize"/><!-- 未授权的页面 -->
<!--动态添加权限控制  -->
<property name="filterChainDefinitionMap" ref="filterChainDefinitionMap"></property>
	<property name="filterChainDefinitions">
            <value>
            </value>
        </property>
</bean>

<!-- 配置一个Bean,这个bean 实际上是一个Map,通过实例工厂方法的方式 -->
<bean id="filterChainDefinitionMap"
factory-bean="filterChainDefinitionMapBuilder"
factory-method="buildFilterChainDefinitionMapBuilder"></bean>

<!-- 把自己写的返回LinkedHashMap的类交给spring管理,也可以使用@Component -->
<bean id="filterChainDefinitionMapBuilder"  class="com.lanxin.util.FilterChainDefinitionMapBuilder"></bean>
|
这里写实例工厂的方法(最好删除xml中的权限控制)
 1
 2
 3
 4
 5
 6
 7
 8
 9
10
11
12
13
14
15
16
17
18
19
20
21
22
|
public class FilterChainDefinitionMapBuilder {


	public LinkedHashMap<String,String> buildFilterChainDefinitionMapBuilder(){

		//在这里通过数据库查询
		LinkedHashMap<String,String>  map=new LinkedHashMap<String,String>();
		map.put("/login/login", "anon");
		map.put("/view/login.jsp", "anon");
    map.put("/view/user.jsp", "perms[删除角色]");
		map.put("/login/index", "perms[删除角色]");
		map.put("/index.jsp", "perms[删除角色]");

    map.put("/view/*.jsp", "anon");
		map.put("/**", "roles[role123]");

		map.put("/**", "authc");

		return map;
	}

}
|
第二章-集成
1SpringBoot集成
集成了redis、session
1导入jar
 1
 2
 3
 4
 5
 6
 7
 8
 9
10
11
12
13
14
15
16
17
18
19
20
21
22
23
24
25
26
27
28
29
30
31
32
33
34
35
36
37
38
39
40
41
42
43
44
45
46
47
48
49
50
51
52
53
54
55
56
57
58
59
60
61
62
63
64
65
66
67
68
|
<?xml version="1.0" encoding="UTF-8"?>
<project xmlns="http://maven.apache.org/POM/4.0.0"
         xmlns:xsi="http://www.w3.org/2001/XMLSchema-instance"
         xsi:schemaLocation="http://maven.apache.org/POM/4.0.0 http://maven.apache.org/xsd/maven-4.0.0.xsd">
    <modelVersion>4.0.0</modelVersion>

    <groupId>org.example</groupId>
    <artifactId>advenced_shiro</artifactId>
    <version>1.0-SNAPSHOT</version>
<parent>
    <artifactId>spring-boot-parent</artifactId>
    <groupId>org.springframework.boot</groupId>
    <version>2.2.4.RELEASE</version>
</parent>

    <dependencies>
        <!-- springboot-web -->
        <dependency>
            <groupId>org.springframework.boot</groupId>
            <artifactId>spring-boot-starter-web</artifactId>
        </dependency>
        <!-- druid -->
        <dependency>
            <groupId>com.alibaba</groupId>
            <artifactId>druid-spring-boot-starter</artifactId>
            <version>1.1.21</version>
        </dependency>

        <!--  mysql数据库-->
        <dependency>
            <groupId>mysql</groupId>
            <artifactId>mysql-connector-java</artifactId>
            <version>5.1.46</version>
        </dependency>
        <!--整合Mybatis plus-->
        <dependency>
            <groupId>com.baomidou</groupId>
            <artifactId>mybatis-plus-boot-starter</artifactId>
            <version>3.1.1</version>
        </dependency>

        <!--springboot整合 shiro -->
        <dependency>
            <groupId>org.apache.shiro</groupId>
            <artifactId>shiro-spring</artifactId>
            <version>1.5.3</version>
        </dependency>

        <!--springboot整合redis 整合shiro-->
        <dependency>
            <groupId>org.springframework.boot</groupId>
            <artifactId>spring-boot-starter-data-redis</artifactId>
        </dependency>
        <dependency>
            <groupId>org.crazycake</groupId>
            <artifactId>shiro-redis</artifactId>
            <version>3.2.3</version>
        </dependency>


        <dependency>
            <groupId>org.projectlombok</groupId>
            <artifactId>lombok</artifactId>
        </dependency>
    </dependencies>

</project>
|
2yml配置
 1
 2
 3
 4
 5
 6
 7
 8
 9
10
11
12
13
14
15
16
17
18
19
20
21
22
23
24
25
|
server:
  port: 8200

spring:
  datasource:
    username: root
    password: 123456
    url: jdbc:mysql://localhost:3306/oa1?serverTimezone=UTC&useUnicode=true&characterEncoding=utf-8
    driver-class-name: com.mysql.jdbc.Driver
    type: com.alibaba.druid.pool.DruidDataSource # 自定义数据源
#集成redis
  redis:
    host: 127.0.0.1
    port: 6379
    timeout: 5000
    jedis:
      pool:
        max-active: 100 #最大连接
        max-idle: 5 #最大空闲
        time-between-eviction-runs: 60000 #运行期间的回收时间

mybatis-plus:
  mapper-locations: classpath:mapper/*.xml
  configuration:
    log-impl: org.apache.ibatis.logging.stdout.StdOutImpl
|
3shiro配置类
  1
  2
  3
  4
  5
  6
  7
  8
  9
 10
 11
 12
 13
 14
 15
 16
 17
 18
 19
 20
 21
 22
 23
 24
 25
 26
 27
 28
 29
 30
 31
 32
 33
 34
 35
 36
 37
 38
 39
 40
 41
 42
 43
 44
 45
 46
 47
 48
 49
 50
 51
 52
 53
 54
 55
 56
 57
 58
 59
 60
 61
 62
 63
 64
 65
 66
 67
 68
 69
 70
 71
 72
 73
 74
 75
 76
 77
 78
 79
 80
 81
 82
 83
 84
 85
 86
 87
 88
 89
 90
 91
 92
 93
 94
 95
 96
 97
 98
 99
100
101
102
103
104
105
106
107
108
109
110
111
112
113
114
115
116
117
118
119
120
121
122
123
124
125
126
127
128
129
130
131
|
package com.lx.config;

import com.lx.shiro.CustomAuthorizingRealm;
import org.apache.shiro.authc.credential.HashedCredentialsMatcher;
import org.apache.shiro.mgt.SecurityManager;
import org.apache.shiro.spring.security.interceptor.AuthorizationAttributeSourceAdvisor;
import org.apache.shiro.spring.web.ShiroFilterFactoryBean;
import org.apache.shiro.web.mgt.DefaultWebSecurityManager;
import org.apache.shiro.web.session.mgt.DefaultWebSessionManager;
import org.crazycake.shiro.RedisCacheManager;
import org.crazycake.shiro.RedisManager;
import org.crazycake.shiro.RedisSessionDAO;
import org.springframework.aop.framework.autoproxy.DefaultAdvisorAutoProxyCreator;
import org.springframework.beans.factory.annotation.Value;
import org.springframework.context.annotation.Bean;
import org.springframework.context.annotation.Configuration;

import java.util.HashMap;
import java.util.Map;

@Configuration
public class ShiroConfig {
    //权限管理,配置主要是Realm的管理认证
    @Bean
    public SecurityManager securityManager(CustomAuthorizingRealm realm) {
        DefaultWebSecurityManager securityManager = new DefaultWebSecurityManager();
        securityManager.setRealm(realm);//1设置realm
        securityManager.setSessionManager(sessionManager());//2设置会话管理
        securityManager.setCacheManager(cacheManager());//3设置缓存管理器
        return securityManager;
    }

    //1自定义realm
    @Bean
    public CustomAuthorizingRealm customRealm(HashedCredentialsMatcher credentialsMatcher){
        CustomAuthorizingRealm realm=new CustomAuthorizingRealm();
        //设置密码匹配器
        realm.setCredentialsMatcher(credentialsMatcher);
        return realm;
    }

    //过滤条件******** 可以查询所有权限,程序开启只运行一次。这样就不需要shiro权限注解了
    @Bean
    public ShiroFilterFactoryBean shiroFilter(SecurityManager securityManager){
        ShiroFilterFactoryBean shiroFilter=new ShiroFilterFactoryBean();
        shiroFilter.setSecurityManager(securityManager);

        Map<String,String> filterMap=new HashMap<String, String>();
        //设置退出 具体代码shiro已经实现
        filterMap.put("/logout","anon");

        //设置不会被拦截的连接
        filterMap.put("/login","anon");
        filterMap.put("/**","authc");

        //设置默认登录界面 前后端分离中后端仅仅返回json数据(页面前端控制)
        shiroFilter.setFilterChainDefinitionMap(filterMap);
        shiroFilter.setLoginUrl("/unauth");
        return shiroFilter;
    }

    //密码匹配器
    @Bean
    public HashedCredentialsMatcher hashedCredentialsMatcher(){
        HashedCredentialsMatcher matcher=new HashedCredentialsMatcher();
        matcher.setHashIterations(1024);
        matcher.setHashAlgorithmName("md5");
        return matcher;
    }

    //======开启shiro aop注解支持=====
    @Bean
    public AuthorizationAttributeSourceAdvisor authorizationAdvison(SecurityManager securityManager){
        AuthorizationAttributeSourceAdvisor authorization=new AuthorizationAttributeSourceAdvisor();
        authorization.setSecurityManager(securityManager);
        return authorization;
    }


    //=====让controller层实现注解控制=====
    @Bean
    public DefaultAdvisorAutoProxyCreator advisorAutoProxyCreator(){
        DefaultAdvisorAutoProxyCreator advisor=new DefaultAdvisorAutoProxyCreator();
        advisor.setProxyTargetClass(true);
        return advisor;
    }

    /*
     * SessionManager
     * 使用shiro-redis插件
     * */
    //2会话管理
    @Bean
    public DefaultWebSessionManager sessionManager() {
        DefaultWebSessionManager sessionManager = new DefaultWebSessionManager();
        sessionManager.setSessionIdUrlRewritingEnabled(false);
        sessionManager.setSessionDAO(redisSessionDAO());
        return sessionManager;
    }
    //会话管理依赖的 -->2
    @Bean
    public RedisSessionDAO redisSessionDAO() {
        RedisSessionDAO redisSessionDAO = new RedisSessionDAO();
        redisSessionDAO.setRedisManager(redisManager());
        return redisSessionDAO;
    }

    //缓存管理器依赖的-->3
    @Value("${spring.redis.host}")
    private String host;
    @Value("${spring.redis.port}")
    private int port;
    @Value("${spring.redis.timeout}")
    private int timeout;

    public RedisManager redisManager() {
        RedisManager redisManager = new RedisManager();
        redisManager.setHost(host+":"+port);
        redisManager.setTimeout(timeout);
        return redisManager;
    }
    //使用redis-shiro完毕

    //3缓存管理器
    public RedisCacheManager cacheManager() {
        RedisCacheManager redisCacheManager = new RedisCacheManager();
        redisCacheManager.setRedisManager(redisManager());
        return redisCacheManager;
    }
}
|
4realm对象
 1
 2
 3
 4
 5
 6
 7
 8
 9
10
11
12
13
14
15
16
17
18
19
20
21
22
23
24
25
26
27
28
29
30
31
32
33
34
35
36
37
38
39
40
41
42
43
44
45
46
47
48
49
50
51
52
53
54
55
56
57
|
package com.lx.config;

import com.lx.mapper.AccountMapper;
import org.apache.shiro.SecurityUtils;
import org.apache.shiro.authc.*;
import org.apache.shiro.authz.AuthorizationInfo;
import org.apache.shiro.authz.SimpleAuthorizationInfo;
import org.apache.shiro.realm.AuthorizingRealm;
import org.apache.shiro.subject.PrincipalCollection;
import org.apache.shiro.subject.Subject;
import org.springframework.beans.factory.annotation.Autowired;

public class UserRealm extends AuthorizingRealm {
    @Autowired
    AccountMapper accountMapper;

    //授权
    @Override
    protected AuthorizationInfo doGetAuthorizationInfo(PrincipalCollection principalCollection) {
        System.out.println("执行了授权");
        //这边应该有个权限表什么的,然后进行授权
        //controller-->先认证-->再授权,如何获得认证的用户呢,可以用Session,
        //也可以在SimpleAuthenticationInfo("",account.getPassword(),"");第一个参数传过来
        //然后取出 subject.getPrincipal();可以强转。
        SimpleAuthorizationInfo info = new SimpleAuthorizationInfo();
        //添加授权 可以添加多个
        info.addStringPermission("user.add");

        Subject subject=SecurityUtils.getSubject();
        subject.getPrincipal();
        info.addStringPermission("");

        return info;
    }
//认证
    @Override
    protected AuthenticationInfo doGetAuthenticationInfo(AuthenticationToken authenticationToken) throws AuthenticationException {
        System.out.println("执行了认证方法==>  ");

        //把认证的authenticationToken转化为用户名密码令牌
        UsernamePasswordToken token = (UsernamePasswordToken) authenticationToken;

        //根据帐号查找account 连接数据库
        com.lx.vo.Account account = accountMapper.getAccountByUsername(token.getUsername());

        //用户名密码 ,可以在数据库中取出,这里方便演示。写固定
       // String username="April"; String password="thirteen";

        //判断帐号是否正确
        if(account==null){
            return null;//自动抛出异常 UnknowAccountException
        }
        //密码认证,shiro自动帮做
        return new SimpleAuthenticationInfo("",account.getPassword(),"");
    }
}
|
5编写controller
 1
 2
 3
 4
 5
 6
 7
 8
 9
10
11
12
13
14
15
16
17
18
19
20
21
22
23
24
25
26
27
28
29
30
31
32
33
34
35
36
37
38
39
40
41
42
43
44
45
46
47
48
49
|
package com.lx.controller;

import com.lx.util.CommonResult;
import org.apache.shiro.SecurityUtils;
import org.apache.shiro.authc.UsernamePasswordToken;
import org.apache.shiro.authz.annotation.RequiresPermissions;
import org.apache.shiro.authz.annotation.RequiresRoles;
import org.apache.shiro.subject.Subject;
import org.springframework.web.bind.annotation.RequestMapping;
import org.springframework.web.bind.annotation.RestController;

@RestController
public class ShiroController {


    @RequestMapping("login")
    public CommonResult login(String name, String password){
        Subject currentUser = SecurityUtils.getSubject();

        UsernamePasswordToken token=new UsernamePasswordToken(name,password);
        currentUser.login(token);
        return CommonResult.getSuccess("登录成功");
    }

    @RequestMapping("unauth")
    public CommonResult unauth() {
        return CommonResult.getFail(12,"没有权限 请登录");
    }

    @RequiresRoles({"卢森林"})
    @RequestMapping("/role/deleteRole")
    public CommonResult deleteRole(){
        return CommonResult.getSuccess("删除角色成功");
    }
    @RequiresPermissions({"/role/addRole"})
    @RequestMapping("/role/addRole")
    public CommonResult addRole(){
        return CommonResult.getSuccess("添加角色成功");
    }

    @RequestMapping("logout")
    public CommonResult logout(){
        Subject currentUser = SecurityUtils.getSubject();
        currentUser.logout();
        return CommonResult.getSuccess("登出成功");
    }
}
|
说明
配置类别说明
/user/add设置的为anon任何人都可以访问,
/user/update为authc必须认证才可访问
没有认证就会到/toLogin页面
//设置登录Url shiroFilterFactoryBean.setLoginUrl("/toLogin”);
filterMap.put("/user/add”,“anon”);
filterMap.put("/user/update”,“authc”);
controller说明
subject.login(token);会到realm对象中去认证,认证中抛出异常,或者认证成功做出不同响应。
 1
 2
 3
 4
 5
 6
 7
 8
 9
10
11
12
|
public String login(String username,String password,Model model){
    //获取当前用户
    Subject subject= SecurityUtils.getSubject();
    //封装用户登录数据
    UsernamePasswordToken token=new UsernamePasswordToken(username,password);
    try {
      //执行登录方法,没异常就好了
      subject.login(token);
    }catch(){
      //  xxxx
    }
}
|
realm对象
认证方法:把AuthenticationToken转为UsernamePasswordToken对象,然后获取帐号,去数据库进行查找。
退出登录currentUser.logout();
2集成Spring
一 环境的配置,1pom.xml,2web.xml,3application.xml
1需要导入 shiro-spring 及 spring-context 依赖,具体请参考 pom.xml。
 1
 2
 3
 4
 5
 6
 7
 8
 9
10
11
12
13
14
15
16
17
18
19
20
21
22
23
24
25
26
27
28
29
30
31
32
33
34
35
36
37
|
<!-- shiro安全框架  -->
<dependency>
    <groupId>org.apache.shiro</groupId>
    <artifactId>shiro-core</artifactId>
    <version>1.5.3</version>
</dependency>

<dependency>
  <groupId>org.apache.shiro</groupId>
  <artifactId>shiro-spring</artifactId>
  <version>1.5.3</version>
</dependency>

<dependency>
  <groupId>org.apache.shiro</groupId>
  <artifactId>shiro-web</artifactId>
  <version>1.5.3</version>
</dependency>

<!-- 日志 -->
<dependency>
  <groupId>log4j</groupId>
  <artifactId>log4j</artifactId>
  <version>1.2.17</version>
</dependency>

<dependency>
  <groupId>org.slf4j</groupId>
  <artifactId>jcl-over-slf4j</artifactId>
  <version>1.7.25</version>
</dependency>

<dependency>
  <groupId>org.slf4j</groupId>
  <artifactId>slf4j-log4j12</artifactId>
  <version>1.7.25</version>
</dependency>
|
2在web.xml加入shiro的过滤,可以把Github上的shiro克隆下来,然后进行查看。
 1
 2
 3
 4
 5
 6
 7
 8
 9
10
11
12
13
14
15
16
17
18
19
20
21
22
23
24
25
26
27
28
29
30
31
32
33
34
35
36
37
38
39
40
41
42
43
44
45
46
47
48
49
50
51
52
53
54
55
56
57
58
59
60
61
62
63
64
65
66
67
68
69
70
71
|
<?xml version="1.0" encoding="UTF-8"?>
<!DOCTYPE xml>
<web-app version="2.5" xmlns="http://java.sun.com/xml/ns/javaee"
	xmlns:xsi="http://www.w3.org/2001/XMLSchema-instance"
	xsi:schemaLocation="http://java.sun.com/xml/ns/javaee
">

	<!-- Springmvc 在web文件中配置 -->
	<servlet>
		<servlet-name>springmvc</servlet-name>
		<servlet-class>org.springframework.web.servlet.DispatcherServlet
		</servlet-class>

		<init-param>
			<param-name>contextConfigLocation</param-name>
			<param-value>classpath:springmvc.xml</param-value>
		</init-param>

	</servlet>
	<servlet-mapping>
		<servlet-name>springmvc</servlet-name>
		<url-pattern>/</url-pattern>
	</servlet-mapping>

	<!-- 配置Springmvc Post请求乱码 -->
	<filter>
		<filter-name>CharacterEncodingFilter</filter-name>
		<filter-class>org.springframework.web.filter.CharacterEncodingFilter
		</filter-class>
		<init-param>
			<param-name>encoding</param-name>
			<param-value>utf-8</param-value>
		</init-param>
	</filter>
	<filter-mapping>
		<filter-name>CharacterEncodingFilter</filter-name>
		<url-pattern>/*</url-pattern>
	</filter-mapping>

	<!-- Spring 在web文件中配置 -->
	<context-param>
		<param-name>contextConfigLocation</param-name>
		<param-value>classpath:applicationContext.xml</param-value>
	</context-param>


	<!-- 配置shiro过滤器 -->
	 	<filter>
	  <filter-name>shiroFilter</filter-name>
	  <filter-class>
	      org.springframework.web.filter.DelegatingFilterProxy
	   </filter-class>
	  <init-param>
	    <param-name>targetFilterLifecycle</param-name>
	    <param-value>true</param-value>
	  </init-param>
	</filter>
	<filter-mapping>
	  <filter-name>shiroFilter</filter-name>
	  <url-pattern>/*</url-pattern>
	</filter-mapping>

    <!-- spring监听 -->
    <listener>
		<listener-class>
			org.springframework.web.context.ContextLoaderListener
		</listener-class>
	</listener>

  <display-name>Archetype Created Web Application</display-name>
</web-app>
|
3application.xml的spring项目,在spring-hibernate中查看(首先配置SecurityManager,由于没用到Ehcase,就不进行配置,该网址是有Ehcase的https://www.cnblogs.com/xiaoliangup/p/10434372.html)
 1
 2
 3
 4
 5
 6
 7
 8
 9
10
11
12
13
14
15
16
17
18
19
20
21
22
23
24
25
26
27
28
29
30
31
32
33
34
35
36
37
38
39
40
41
42
43
44
45
46
47
48
49
50
51
52
53
54
55
|
<?xml version="1.0" encoding="UTF-8"?>
<beans xmlns="http://www.springframework.org/schema/beans"
    xmlns:xsi="http://www.w3.org/2001/XMLSchema-instance"
     	xmlns:aop="http://www.springframework.org/schema/aop"
    xsi:schemaLocation="http://www.springframework.org/schema/beans
    http://www.springframework.org/schema/beans/spring-beans.xsd
  http://www.springframework.org/schema/aop http://www.springframework.org/schema/aop/spring-aop-3.0.xsd">

<!--
    1. 配置 SecurityManager!
    若有多个realm可以用 realms /relm/ 领域,范围;王国。
    可以自行继承AuthorizingRealm(其是Realm接口的子孙类,Realm 接口是Shiro中所有Realm的顶级接口)
    -->
   <bean id="securityManager" class="org.apache.shiro.web.mgt.DefaultWebSecurityManager">
        <!-- Single realm app (realm configured next, below).  If you have multiple realms, use the 'realms'
      property instead. -->
        <property name="realm" ref="thirdRealm"  />
        <property name="sessionManager" ref="sessionManager"/>
    </bean>
<!--1.1 session会话管理  -->
    <bean id="sessionManager" class="org.apache.shiro.web.session.mgt.DefaultWebSessionManager">
        <property name="sessionIdUrlRewritingEnabled" value="false"/>
    </bean>
<!--1.2 实现的realm接口  -->
   <bean id="thirdRealm" class="com.lanxin.qx.realm.ThirdRealm">

   </bean>

    <!--2配置lifecycleBeanPostProcessor ,可以自动调用配置在Ioc容器中的shiro bean的生命周期方法
     Post processor that automatically invokes init() and destroy() methods -->
    <bean id="lifecycleBeanPostProcessor" class="org.apache.shiro.spring.LifecycleBeanPostProcessor"/>

   <!-- 3使用shiro安全检查注解 -->
	<bean class="org.springframework.aop.framework.autoproxy.DefaultAdvisorAutoProxyCreator" depends-on="lifecycleBeanPostProcessor" />

    <!-- 4配置shiroFilter ,Id必须和web.xml中的delegatingFilterProxy的<fileter-name>一致  -->
    <bean id="shiroFilter" class="org.apache.shiro.spring.web.ShiroFilterFactoryBean">
        <property name="securityManager" ref="securityManager"/>
        <property name="loginUrl" value="/view/login.jsp" /><!-- 登录页面 -->
        <property name="successUrl"  value="/login/shouye" /><!-- 登录成功页面 -->
        <property name="unauthorizedUrl" value="/function/showMyFunction?state=shiro"/><!-- 未授权的页面 -->
<!--  -->
		<property name="filterChainDefinitionMap" ref="filterChainDefinitionMap"></property>
    </bean>

<!-- 配置一个Bean,这个bean 实际上是一个Map,通过实例工厂方法的方式 -->
<bean id="filterChainDefinitionMap"
factory-bean="filterChainDefinitionMapBuilder"
factory-method="buildFilterChainDefinitionMapBuilder"></bean>

<!-- 把自己写的返回LinkedHashMap的类交给spring管理,也可以使用@Component -->
<bean id="filterChainDefinitionMapBuilder"  class="com.lanxin.util.FilterChainDefinitionMapBuilder"></bean>

</beans>
|
这里表示哪些页面放行,哪些页面需要权限。
 1
 2
 3
 4
 5
 6
 7
 8
 9
10
11
12
13
14
15
16
17
18
19
20
21
22
23
24
25
26
27
28
29
30
31
32
33
34
35
36
37
38
39
40
41
42
43
44
45
|
package com.lanxin.util;

import java.util.ArrayList;
import java.util.LinkedHashMap;

import org.springframework.beans.factory.annotation.Autowired;
import org.springframework.stereotype.Component;

import com.lanxin.qx.bean.QxFunction;
import com.lanxin.qx.dao.FunctionDao;


public class FilterChainDefinitionMapBuilder {

	@Autowired
	FunctionDao funDao;

	public LinkedHashMap<String,String> buildFilterChainDefinitionMapBuilder(){

		ArrayList<QxFunction> funs=	funDao.findAllChildrenAuthority();

		//在这里通过数据库查询
		LinkedHashMap<String,String>  map=new LinkedHashMap<String,String>();

		//放行的
		map.put("/view/login.jsp", "anon");
		map.put("/login/login", "anon");
		map.put("/view/**", "anon");//静态资源放行

		map.put("/login/droptout", "logout");//退出

		//需要权限的 从数据库查出
		if(funs.size()>0) {
			for(QxFunction f:funs) {
				map.put(f.getMethod(), "perms["+f.getFunctionName()+"]");
				System.out.println(" f.getMethod():"+f.getMethod()+"   方法名称:"+"perms["+f.getFunctionName()+"]");
			}
		}

		map.put("/**", "authc");

		return map;
	}

}
|
AuthorizingRealm 授权范围类
  1
  2
  3
  4
  5
  6
  7
  8
  9
 10
 11
 12
 13
 14
 15
 16
 17
 18
 19
 20
 21
 22
 23
 24
 25
 26
 27
 28
 29
 30
 31
 32
 33
 34
 35
 36
 37
 38
 39
 40
 41
 42
 43
 44
 45
 46
 47
 48
 49
 50
 51
 52
 53
 54
 55
 56
 57
 58
 59
 60
 61
 62
 63
 64
 65
 66
 67
 68
 69
 70
 71
 72
 73
 74
 75
 76
 77
 78
 79
 80
 81
 82
 83
 84
 85
 86
 87
 88
 89
 90
 91
 92
 93
 94
 95
 96
 97
 98
 99
100
101
102
103
104
105
106
107
108
109
110
111
112
113
114
115
116
117
118
119
120
121
122
123
124
125
126
127
128
129
130
131
132
133
134
135
136
137
138
139
140
141
142
143
144
145
146
147
148
149
150
151
|
package com.lanxin.qx.realm;

import java.util.ArrayList;
import java.util.HashSet;
import java.util.Set;

import org.apache.shiro.SecurityUtils;
import org.apache.shiro.authc.AuthenticationException;
import org.apache.shiro.authc.AuthenticationInfo;
import org.apache.shiro.authc.AuthenticationToken;
import org.apache.shiro.authc.LockedAccountException;
import org.apache.shiro.authc.SimpleAuthenticationInfo;
import org.apache.shiro.authc.UnknownAccountException;
import org.apache.shiro.authc.UsernamePasswordToken;
import org.apache.shiro.authz.AuthorizationInfo;
import org.apache.shiro.authz.SimpleAuthorizationInfo;
import org.apache.shiro.crypto.hash.SimpleHash;
import org.apache.shiro.realm.AuthorizingRealm;
import org.apache.shiro.realm.Realm;
import org.apache.shiro.session.Session;
import org.apache.shiro.subject.PrincipalCollection;
import org.apache.shiro.util.ByteSource;
import org.springframework.beans.factory.annotation.Autowired;

import com.lanxin.lc.dao.ILcApprovalDao;
import com.lanxin.lc.dao.ILcFlowDao;
import com.lanxin.qx.bean.QxFunction;
import com.lanxin.qx.bean.QxRole;
import com.lanxin.qx.controller.FunctionController;
import com.lanxin.qx.dao.FunctionDao;
import com.lanxin.qx.impl.FunctionDaoImpl;
import com.lanxin.rs.bean.ZzAccount;
import com.lanxin.rs.bean.ZzEmployee;

public class ThirdRealm extends AuthorizingRealm {

	//查询账号方法
	@Autowired
	ILcApprovalDao approvalDao;

	//通过账号查询员工
	@Autowired
	ILcFlowDao LcFlowDao;

	//用于获取当前的权限
	@Autowired
 	FunctionDao funDao;

	//用于授权方法
	@Override
	protected AuthorizationInfo doGetAuthorizationInfo(PrincipalCollection principals) {
		System.out.println(" AuthorizingRealm ------principals认证");


		SimpleAuthorizationInfo info=new SimpleAuthorizationInfo();
		//1从PrincipalConllection中获得登录用户信息
		ZzEmployee principal = (ZzEmployee) principals.getPrimaryPrincipal();// 获取认证方法传来的第一个参数,一般为用户对象
		Set<QxFunction> funs = this.getAuthoritysByEid(principal.getOid());
		if (funs.size() > 0) {
			for (QxFunction f : funs) {
				info.addStringPermission(f.getFunctionName());
				System.out.println(" 添加了方法-------"+f.getFunctionName());
			}
		}

		//4返回SimpleAuthorizationInfo对象
		return info;
	}

	//用于认证方法
	@Override
	protected AuthenticationInfo doGetAuthenticationInfo(AuthenticationToken token) throws AuthenticationException {
		System.out.println(" AuthorizingRealm ------token认证");
		//获得当前的 Subject主体
		org.apache.shiro.subject.Subject currentUser = SecurityUtils.getSubject();
		//通过主题获得session
		Session session=currentUser.getSession();
		 //1把认证的authenticationToken转化为用户名密码令牌
		 UsernamePasswordToken upToken = (UsernamePasswordToken) token;

		 //2从UsernamePasswordToken取出username
		 String tokenUsername=upToken.getUsername();
		 String tokenPassword=String.valueOf(upToken.getPassword());

		 //3从数据库取出用户名密码 ,这里方便演示。写固定
		 ZzAccount account=LcFlowDao.selectUniqueDl(tokenUsername, tokenPassword);
		 String username=null;
		 String password=null;
		 if(account!=null) {
		 username=tokenUsername;
		  password=tokenPassword;
		 }
		/*
		 * //4若用户不存在(数据库对象为null),则可以抛出UnknowAccountException,返回null自动抛出
		 * if("".equals(tokenAccount)) { System.out.println("用户不存在"); throw new
		 * UnknownAccountException("用户不存在");//自动抛出异常 UnknowAccountException }
		 */

		 if(account==null) {
			 throw new UnknownAccountException("用户不存在,或密码错误");
		 }

		 //5根据用户信息情况,决定是否抛出其他AccountException
		 if(!"1".equals(String.valueOf(account.getInactive()))){
		     throw new LockedAccountException("用户被锁定");
		 }


		 System.out.println("登录成功");
		 //存放到session
		 session.setAttribute("account", account);//存放账号
		 System.out.println("=========存放账号=====");
		 ZzEmployee emp=approvalDao.selectEmpId(account.getUid());//得到员工信息
		 System.out.println("=========存放账号结束=====");

		  session.setAttribute("emp", emp);//存放员工
		  session.setAttribute("username", emp.getEmpName());//存放员工

		  SimpleAuthenticationInfo  authentication= new SimpleAuthenticationInfo(emp, tokenPassword,getName());
		return authentication;
	}


	public static void main(String[] args) {
		String hashAlonrithmName="MD5";
		Object credentials="123456";
		Object salt=ByteSource.Util.bytes("April");//使用username
		int hashIterations=1024;
		Object result=new SimpleHash(hashAlonrithmName, credentials, salt, hashIterations);
		System.out.println(result);
	}

	// 获取当前员工的 权限方法  抽取出来,
		public  Set<QxFunction> getAuthoritysByEid(Integer eid){
			//根据EID查询这个员工,然后取出该员工的角色
					ArrayList<ZzEmployee> emps=funDao.findAuthorityByEid(eid);
					Set<QxRole> roleSet= emps.get(0).getRoles();

					//权限方法的集合
					Set<QxFunction> funSet=new HashSet<>();
					if(roleSet.size()>0) {
						for(QxRole role:roleSet) {
							funSet.addAll(role.getAuthority());
						}
					}
			return funSet;
		}

}
|
3权限名称
注意 shiro.ini
 1
 2
 3
 4
 5
 6
 7
 8
 9
10
11
12
13
14
15
16
|
这个问题出现的原有是web.xml配置不一致.
#报错:Caused by: org.apache.shiro.env.RequiredTypeException:
#Object named 'filterChainResolver' is not of required type [org.apache.shiro.web.filter.mgt.FilterChainResolver].
[urls]
/index.jsp = authc
/ = authc
/admin.jsp = authc,roles[role1]
/login = anon
/logout = logout
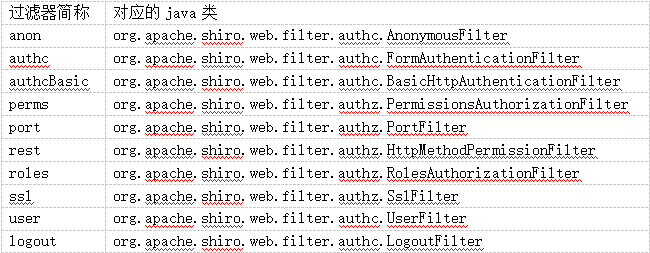
anon: 无需认证即可访问
authc: 需要认证才可访问
user: 点击“记住我”功能可访问
perms: 拥有权限才可以访问
roles: 拥有某个角色权限才能访问
logout:登出
|