面试题一览
第一章-SpringBoot概述
Spring回顾
是什么
为了解决企业级应用开发的复杂性而创建,简化开发
如何简化的
1、基于POJO的轻量级和最小侵入性编程;
2、通过IOC,依赖注入(DI)和面向接口实现松耦合;
3、基于切面(AOP)和惯例进行声明式编程;
4、通过切面和模版减少样式代码;
学习文档博客:https://cloudlandboy.github.io/myNote/#/backend/springboot/templateengine?id=%e8%af%ad%e6%b3%95%e8%a7%84%e5%88%99
1什么是SpringBoot
是什么:本质上简化spring
配置如何编写yaml
自动装配原理
继承web开发:业务的核心
集成数据库:druid
分布式开发:Dubbo(RPC调用)+zookeeper
swagger:接口文档,方便前后端开发
任务调度
SpringSecurity Shiro 安全框架AOP思想
2项目创建
官网创建:https://spring.io/projects/spring-boot#overview
进入SpringBoot官网projects/spring-boot
选择GA稳定版–>OverView(n. [图情] 综述;概观)–>Quick start
选择project工程类型,language语言
generate-Ctral+ 使形成
下载后解压
IDEA导入该工程
view–>Tool Window–>project若没有工程视图就展示
java文件夹下点击运行
**IDEA快速创建:**常用
new Project/new Module
Spring Initializr–>next–>选择和命名–>选择依赖–>一般选web SpringWeb
此种方法会发现class或者@Test无法运行
解决1
会出现问题
file–>Project Structure–>Modules–>
点击+号 Import Module–>重新导入
解决2
会出现问题
SRC右击–>Mark Directory as
依赖
在有parent项目后,使用springboot相关的web项目就可以不用设置版本号。
1
2
3
4
5
6
|
<parent>
        <groupId>org.springframework.boot</groupId>
        <artifactId>spring-boot-starter-parent</artifactId>
        <version>2.2.6.RELEASE</version>
        <relativePath/> <!-- lookup parent from repository -->
</parent>
|
 1
 2
 3
 4
 5
 6
 7
 8
 9
10
11
12
13
14
15
16
17
18
19
20
21
22
23
24
25
26
27
28
29
30
31
|
   <properties>
      <java.version>1.8</java.version>
   </properties>
   <dependencies>
      <!--springBoot依赖 tomcat,dispatcherServlet,xml -->
      <dependency>
         <groupId>org.springframework.boot</groupId>
         <artifactId>spring-boot-starter-web</artifactId>
      </dependency>
      <!--单元测试-->
      <dependency>
         <groupId>org.springframework.boot</groupId>
         <artifactId>spring-boot-starter-test</artifactId>
         <scope>test</scope>
         <exclusions>
            <exclusion>
               <groupId>org.junit.vintage</groupId>
               <artifactId>junit-vintage-engine</artifactId>
            </exclusion>
         </exclusions>
      </dependency>
   </dependencies>
<!--   打jar包的插件-->
   <build>
      <plugins>
         <plugin>
            <groupId>org.springframework.boot</groupId>
            <artifactId>spring-boot-maven-plugin</artifactId>
         </plugin>
      </plugins>
   </build>
|
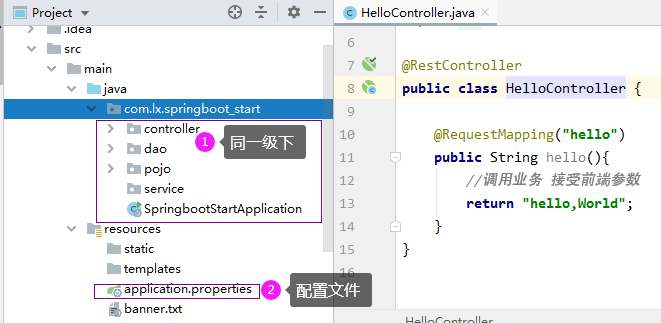
项目结构:
.resources文件夹中目录结构
static :保存所有的静态资源; js Css images ;
templates :保存所有的模板页面; ( Spring Boot默认jar包使用嵌入式的Tomcat,默认不支持]SP页
面) ;可以使用模板引擎( freemarker、thymeleaf) ;
application.properties : Spring Boot应用的配置文件;可以修改-一些默认设置 ;
1快速使用
springboot的启动类,会自动扫描当前包下的所有文件。
修改端口号
application.properties–>加上server.port=8999
修改图形(了解即可)
application.properties目录下建立一个banner.txt看到有小点
bootSchool网址下找ASCII工具
直接运行SpringbootStratApplication就好。
导入其他配置文件,在启动类下用@ImportResource(locations = {“classpath:bean.xml”})
2热部署
1、加maven依赖
1
2
3
4
5
|
<dependency>
    <groupId>org.springframework.boot</groupId>
    <artifactId>spring-boot-devtools</artifactId>
    <optional>true</optional>
</dependency>
|
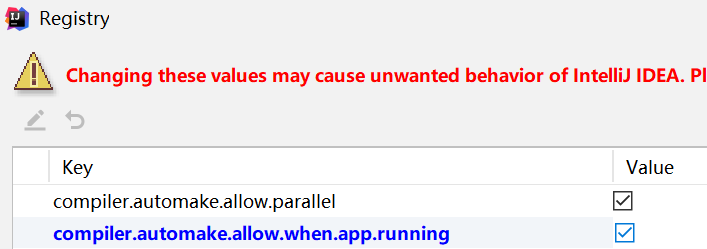
2CTRL + SHIFT + A –> 查找Registry –> 找到并勾选compiler.automake.allow.when.app.running 然后点击close
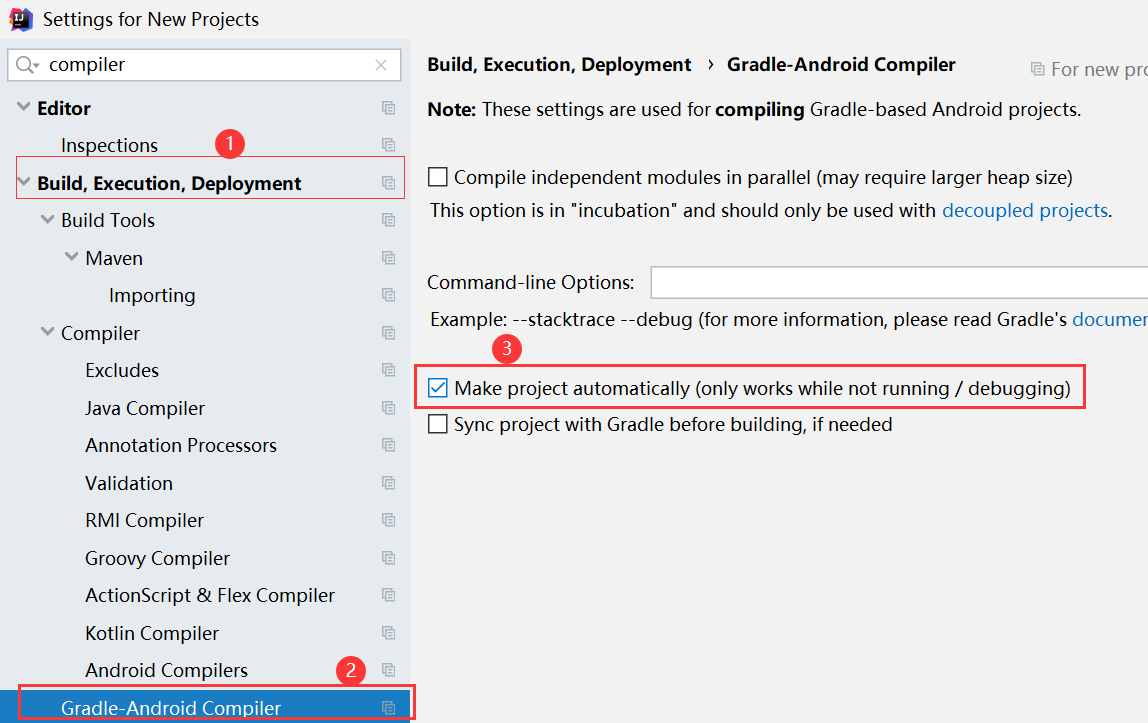
3IDEA设置
当前项目
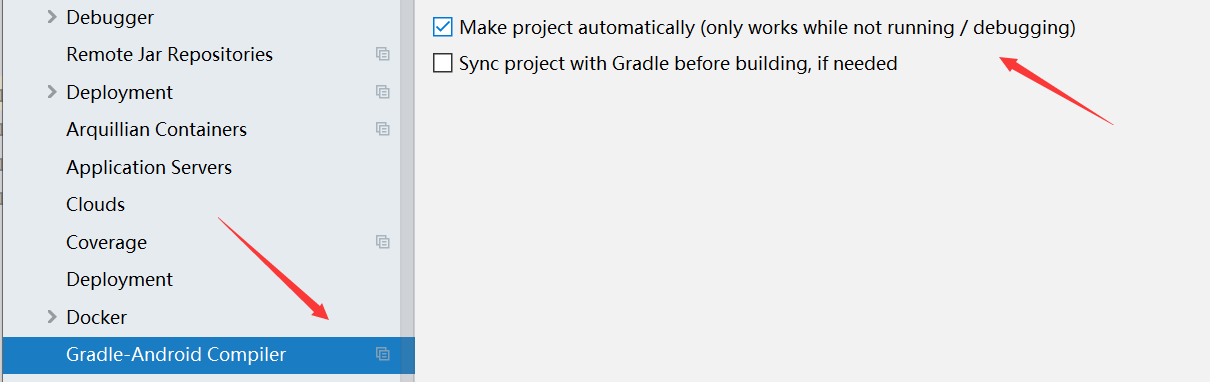
全局设置
3原理初探
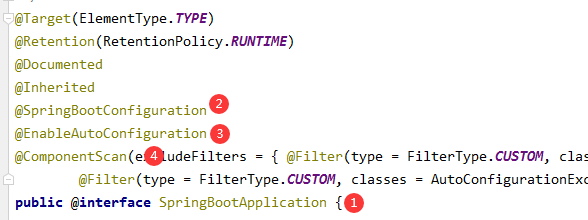
1 ==@SpringBootApplication==注解,标注在某个类上说明这个类是SpringBoot的主配置类 , SpringBoot就应该运行这个类的main方法来启动SpringBoot应用。
在这个注解之下还有其他注解,如上图。
2 @SpringBootConfiguration
作用:SpringBoot的配置类 ,标注在某个类上 , 表示这是一个SpringBoot的配置类;
我们继续进去这个注解查看@Configuration—>@Component
这里的 @Configuration,说明这是一个配置类 ,配置类就是对应Spring的xml 配置文件;
里面的 @Component 这就说明,启动类本身也是Spring中的一个组件而已,负责启动应用!
我们回到 SpringBootApplication 注解中继续看。
3 @EnableAutoConfiguration开启自动配置
其中包含以下几个注解:
1 @AutoConfigurationPackage
又包含@Import(AutoConfigurationPackages.Registrar.class)Spring底层注解@import , 给容器中导入一个组件
Registrar.class 作用:将主启动类的所在包及包下面所有子包里面的所有组件扫描到Spring容器 ;
2@Import(AutoConfigurationImportSelector.class)
AutoConfigurationImportSelector :自动配置导入选择器,那么它会导入哪些组件的选择器呢?我们点击去这个类看源码:其中找到getCandidateConfigurations方法,这个方法中有一个SpringFactoriesLoader.loadFactoryNames()方法,再进去查看loadSpringFactories()方法,看到出现了这样一个路径“META-INF/spring.factories”
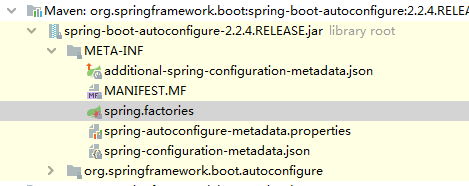
我们根据源头打开spring.factories , 看到了很多自动配置的文件;这就是自动配置根源所在!
4@ComponentScan
这个注解在Spring中很重要 ,它对应XML配置中的元素。
作用:自动扫描并加载符合条件的组件或者bean , 将这个bean定义加载到IOC容器中
结论:
-
SpringBoot在启动的时候从类路径下的META-INF/spring.factories中获取EnableAutoConfiguration指定的值
-
将这些值作为自动配置类导入容器 , 自动配置类就生效 , 帮我们进行自动配置工作;
-
整个J2EE的整体解决方案和自动配置都在springboot-autoconfigure的jar包中;
-
它会给容器中导入非常多的自动配置类 (xxxAutoConfiguration), 就是给容器中导入这个场景需要的所有组件 , 并配置好这些组件 ;
-
有了自动配置类 , 免去了我们手动编写配置注入功能组件等的工作;
3配置文件
SpringBoot使用一个全局的配置文件 , 配置文件名称是固定的
-
application.properties
-
-
application.yml
-
**配置文件的作用 :**修改SpringBoot自动配置的默认值,因为SpringBoot在底层都给我们自动配置好了;
比如我们可以在配置文件中修改Tomcat 默认启动的端口号!测试一下!
1
2
3
4
|
server.port=8081
server.context-path=/crud

server.tomcat.uri-encoding=UTF-8
|
YAML
YAML是 “YAML Ain’t a Markup Language” (YAML不是一种标记语言)的递归缩写。在开发的这种语言时,YAML 的意思其实是:“Yet Another Markup Language”(仍是一种标记语言)
这种语言以数据作为中心,而不是以标记语言为重点!
以前的配置文件,大多数都是使用xml来配置;比如一个简单的端口配置,我们来对比下yaml和xml
传统xml配置:
1
2
3
|
<server>
	<port>8081<port
></server>
|
yaml配置:
==YAML语法==
基本语法
1
2
3
|
student:
name: qinjiang
age: 3
|
说明:语法要求严格!
1、k:空格v 表示一对键值对,空格必须有
2、以缩进来控制层级关系,只要是左边对齐的一列数据都是同一个层级的。
3、属性和值的大小写都是十分敏感的。
值的表示:
“ ” 双引号,会转义特殊字符 ,特殊字符会作为本身想表示的意思;
比如 :name: “kuang \n shen” 输出 :kuang 换行 shen
'’ 单引号,不会转义字符串里面的特殊字符 ,特殊字符最终会变成和普通字符一样输出
比如 :name: ‘kuang \n shen’ 输出 :kuang \n shen
对象、Map(键值对)
1
2
3
4
5
6
|
student:
    name: qinjiang
    age: 3
#行内写法
student: {name: qinjiang,age: 3}
|
数组( List、set )
用 - 值表示数组中的一个元素,比如:
1
2
3
4
5
6
7
|
pets:
- cat
- dog
- pig
#行内
pets: [cat,dog,pig]
|
YAML进行属性注入
person.class
实体类,@ConfigurationProperties(prefix = “person”)加上prefix等于yml定义的对象
1
2
3
4
5
6
7
8
9
10
11
12
13
14
15
16
17
18
19
20
21
22
|
package com.lx.springboot_start.pojo;
import lombok.Data;
import org.springframework.boot.context.properties.ConfigurationProperties;
import org.springframework.stereotype.Component;
import java.util.Date;
import java.util.List;
import java.util.Map;
@Component //注册bean
@Data
@ConfigurationProperties(prefix = "person")
public class Person {
private String name;
private Integer age;
private Boolean happy;
private Date birth;
private Map<String,Object> maps;
private List<Object> lists;
private Dog dog;
}
|
person.yml
 1
 2
 3
 4
 5
 6
 7
 8
 9
10
11
12
13
14
15
16
17
18
19
20
21
22
23
|
server:
port: 9000
person:
name: 李强
age: 34
happy: true
birth: 2019/05/04
maps:
name: cat
age: 33
lists:
- 李明
- 爱好
- 吃喝玩乐
- 学习
dog:
nage: smallyello
age: 22
#yml支持占位符等。
#person:
# name: qinjiang${random.uuid} # 随机uuid
# age: ${random.int} # 随机int
|
pom.xml
1
2
3
4
5
6
|
<!-- 导入配置文件处理器,配置文件进行绑定就会有提示,需要重启 -->
<dependency>
<groupId>org.springframework.boot</groupId>
<artifactId>spring-boot-configuration-processor</artifactId>
<optional>true</optional>
</dependency>
|
properties属性注入
另外两个注解
@PropertySource(value = “classpath:person.properties”)加载指定的配置文件;
@configurationProperties:默认从全局配置文件(如application.properties)中获取值;
@ConfigurationProperties(prefix = “person”)
IDEA需在设置setting中,查找file encoding,勾选ransparent native-to-ascii conversion
1
2
3
4
5
6
7
8
9
|
person1.name="李强1"
person1.age=11
person1.happy=true
person1.birth=2019/05/04
person1.maps.name=cat
person1.maps.age=33
person1.lists=13,134
person1.dog.name=small
person1.dog.age=11
|
YAML总结/JSR303校验
可以直接在实体类属性中
@value(“李强”)
@Value("#{9*2}") // #{SPEL} Spring表达式
@Value(“${user.name}") //从配置文件中取值
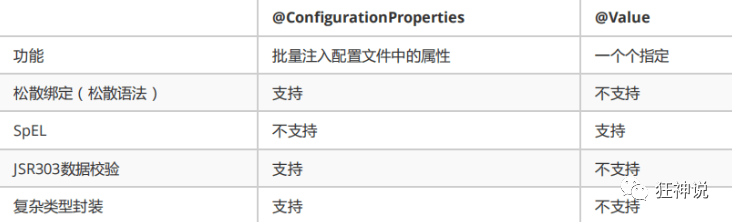
1、@ConfigurationProperties只需要写一次即可 , @Value则需要每个字段都添加
2、松散绑定:这个什么意思呢? 比如我的yml中写的last-name,这个和lastName是一样的, - 后面跟着的字母默认是大写的。这就是松散绑定。可以测试一下
3、JSR303数据校验 , 这个就是我们可以在字段是增加一层过滤器验证 , 可以保证数据的合法性。
1
2
3
4
5
|
@Validated //数据校验public class Person {
@Email(message="邮箱格式错误") //name必须是邮箱格式
private String name;
}
// 详情如下
|
4、复杂类型封装,yml中可以封装对象 , 使用value就不支持
JSR303数据校验
 1
 2
 3
 4
 5
 6
 7
 8
 9
10
11
12
13
14
15
16
17
18
19
20
21
22
23
24
25
26
27
28
29
30
31
32
|
@Validated //数据校验
public class Person {
@NotNull(message="名字不能为空")
private String userName;
@Max(value=120,message="年龄最大不能查过120")
private int age;
@Email(message="邮箱格式错误")
private String email;
//空检查
@Null 验证对象是否为null
@NotNull 验证对象是否不为null, 无法查检长度为0的字符串
@NotBlank 检查约束字符串是不是Null还有被Trim的长度是否大于0,只对字符串,且会去掉前后空格.
@NotEmpty 检查约束元素是否为NULL或者是EMPTY.
//Booelan检查
@AssertTrue 验证 Boolean 对象是否为 true
@AssertFalse 验证 Boolean 对象是否为 false
//长度检查
@Size(min=, max=) 验证对象(Array,Collection,Map,String)长度是否在给定的范围之内
@Length(min=, max=) string is between min and max included.
//日期检查
@Past 验证 Date 和 Calendar 对象是否在当前时间之前
@Future 验证 Date 和 Calendar 对象是否在当前时间之后
@Pattern 验证 String 对象是否符合正则表达式的规则
//.......等等
//除此以外,我们还可以自定义一些数据校验规则
|
多环境切换
profile是Spring对不同环境提供不同配置功能的支持,可以通过激活不同的环境版本,实现快速切换环境;
多配置文件
我们在主配置文件编写的时候,文件名可以是 application-{profile}.properties/yml , 用来指定多个环境版本;
例如:
application-test.properties 代表测试环境配置
application-dev.properties 代表开发环境配置
但是Springboot并不会直接启动这些配置文件,它默认使用application.properties主配置文件;
我们需要通过一个配置来选择需要激活的环境:
比如在配置文件中指定使用dev环境,我们可以通过设置不同的端口号进行测试;**
我们启动SpringBoot,就可以看到已经切换到dev下的配置了;**
spring.profiles.active=dev
yaml的多文档块
和properties配置文件中一样,但是使用yml去实现不需要创建多个配置文件,更加方便了 !
yml也可以像properties起名称,可以把通用的放在上面
1
2
3
4
5
6
7
8
9
10
11
12
13
14
15
16
17
18
19
20
21
22
|
#---用来分割配置环境
server:
port: 8081
#选择要激活那个环境块
spring:
profiles:
active: prod
---
server:
port: 8083
spring:
profiles: dev #配置环境的名称
---
server:
port: 8084
spring:
profiles: prod #配置环境的名称
|
注意:如果yml和properties同时都配置了端口,并且没有激活其他环境 , 默认会使用properties配置文件的!
springboot 启动会扫描以下位置的application.properties或者application.yml文件作为Spring boot的默认配置文件:
优先级1:项目路径下的config文件夹配置文件
优先级2:项目路径下配置文件
优先级3:资源路径下的config文件夹配置文件
优先级4:资源路径下配置文件
优先级由高到底,高优先级的配置会覆盖低优先级的配置;
SpringBoot会从这四个位置全部加载主配置文件;互补配置;
我们在最低级的配置文件中设置一个项目访问路径的配置来测试互补问题;
#配置项目的访问路径
server.servlet.context-path=/kuang
4自动配置原理
在jar包中找到springboot-autoconfiguration的spring.factories
以**HttpEncodingAutoConfiguration(Http编码自动配置)**为例解释自动配置原理;
1
2
3
4
5
6
7
8
9
10
11
12
13
14
15
16
17
18
19
20
21
22
23
24
25
26
27
28
29
30
31
32
33
34
35
36
37
38
39
40
41
|
//表示这是一个配置类,和以前编写的配置文件一样,也可以给容器中添加组件;
@Configuration(proxyBeanMethods = false)
//启动指定类的ConfigurationProperties功能;
//进入这个HttpProperties查看,将配置文件中对应的值和HttpProperties绑定起来;
//并把HttpProperties加入到ioc容器中
@EnableConfigurationProperties(HttpProperties.class)
//Spring底层@Conditional注解
//根据不同的条件判断,如果满足指定的条件,整个配置类里面的配置就会生效;
//这里的意思就是判断当前应用是否是web应用,如果是,当前配置类生效
@ConditionalOnWebApplication(type = ConditionalOnWebApplication.Type.SERVLET)
//判断当前项目有没有这个类CharacterEncodingFilter;SpringMVC中进行乱码解决的过滤器;
@ConditionalOnClass(CharacterEncodingFilter.class)
//判断配置文件中是否存在某个配置:spring.http.encoding.enabled;
//如果不存在,判断也是成立的
//即使我们配置文件中不配置pring.http.encoding.enabled=true,也是默认生效的;
@ConditionalOnProperty(prefix = "spring.http.encoding",
value = "enabled",
matchIfMissing = true)
public class HttpEncodingAutoConfiguration {
//他已经和SpringBoot的配置文件映射了
private final Encoding properties;
//只有一个有参构造器的情况下,参数的值就会从容器中拿
public HttpEncodingAutoConfiguration(HttpProperties properties) {
this.properties = properties.getEncoding();
}
//给容器中添加一个组件,这个组件的某些值需要从properties中获取
@Bean
@ConditionalOnMissingBean //判断容器没有这个组件?
public CharacterEncodingFilter characterEncodingFilter() {
CharacterEncodingFilter filter = new OrderedCharacterEncodingFilter();
filter.setEncoding(this.properties.getCharset().name());
filter.setForceRequestEncoding(this.properties.shouldForce(org.springframework.boot.autoconfigure.http.HttpProperties.Encoding.Type.REQUEST));
filter.setForceResponseEncoding(this.properties.shouldForce(org.springframework.boot.autoconfigure.http.HttpProperties.Encoding.Type.RESPONSE));
return filter;
}
//。。。。。。。
|
精髓
1、SpringBoot启动会加载大量的自动配置类
2、我们看我们需要的功能有没有在SpringBoot默认写好的自动配置类当中;
3、我们再来看这个自动配置类中到底配置了哪些组件;(只要我们要用的组件存在在其中,我们就不需要再手动配置了)
4、给容器中自动配置类添加组件的时候,会从properties类中获取某些属性。我们只需要在配置文件中指定这些属性的值即可;
**xxxxAutoConfigurartion:自动配置类;**给容器中添加组件
xxxxProperties:封装配置文件中相关属性;
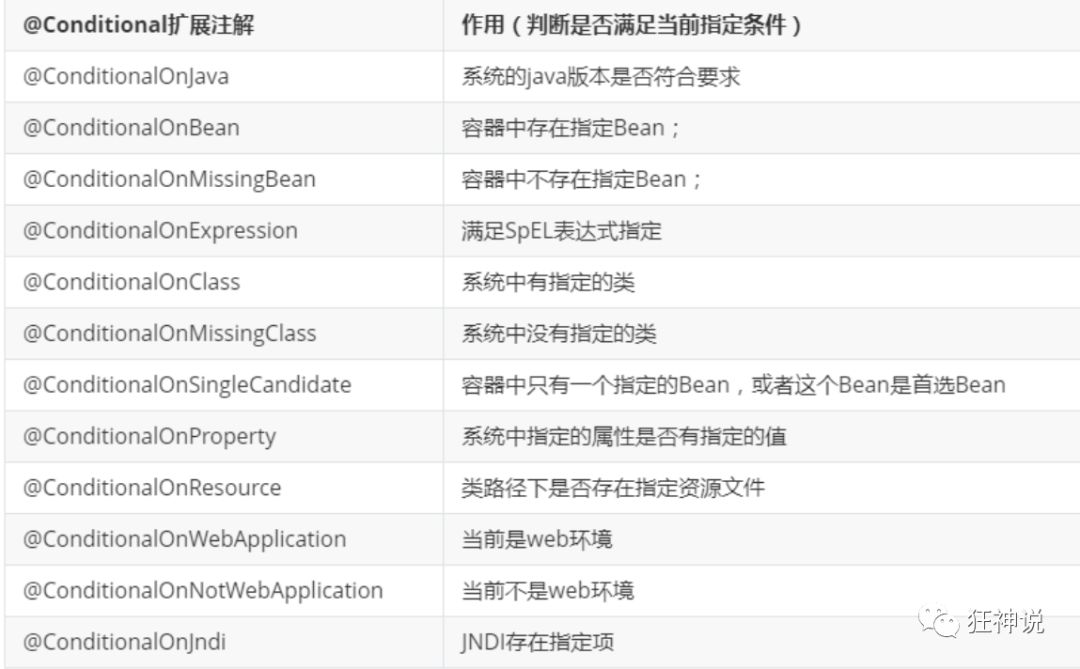
了解:@Conditional
自动配置类必须在一定的条件下才能生效;
@Conditional派生注解(Spring注解版原生的@Conditional作用)
作用:必须是@Conditional指定的条件成立,才给容器中添加组件,配置配里面的所有内容才生效;
那么多的自动配置类,必须在一定的条件下才能生效;也就是说,我们加载了这么多的配置类,但不是所有的都生效了。
我们怎么知道哪些自动配置类生效?
我们可以通过启用 debug=true属性;来让控制台打印自动配置报告,这样我们就可以很方便的知道哪些自动配置类生效;
1
|
#开启springboot的调试类debug=true
|
Positive matches:(自动配置类启用的:正匹配)
Negative matches:(没有启动,没有匹配成功的自动配置类:负匹配)
Unconditional classes: (没有条件的类)
MVC原理
我们找到 WebMvcAutoConfiguration , 然后搜索ContentNegotiatingViewResolver,然后进入这个类进行查看视图解析器resolveViewName方法,在找到其中的getBestView()查看如何查找视图的。
5日志
加入jar
1
2
3
4
5
6
|
<!--日志-->
<dependency>
<groupId>org.springframework.boot</groupId>
<artifactId>spring-boot-starter-log4j</artifactId>
<version>1.3.8.RELEASE</version>
</dependency>
|
在java类中使用
1
2
3
4
5
6
7
8
9
10
11
12
13
14
|
import org.slf4j.Logger;
import org.slf4j.LoggerFactory;
public class HelloWorld {
public static void main(String[] args) {
Logger logger = LoggerFactory.getLogger(HelloWorld.class);
logger.trace("Hello World");
logger.debug("Hello World");
//springBoot默认info级别,info及以上级别才会生效
logger.info("Hello World");
logger.warn("Hello World");
logger.error("Hello World");
}
}
|
SpringBoot日志设置
application.properties设置
1
2
3
4
5
6
7
8
9
10
11
12
13
14
15
16
17
18
|
logging.level.限定包中的类com=trace级别
#指定盘符和位置如 F:/springboot.log,指定路径。 注意:path和name只生效一个,默认生效name
logging.file.path=
#在当前项目下生成springboot.log日志,指定名称
logging.file.name=springboot
#指定控制台/文件中生成格式
日志输出格式:
%d表示日期时间,
%thread表示线程名,
%-51eve1 :级别从左显示5个字符宽度
%logger{50}表示1ogger名字最长50个字符,否则按照句点分割。
%msg:日志消息,
%n是换行符
#logging.pattern.console='%d{yyyy-MMM-dd HH:mm:ss.SSS} %-5level [%thread] %logger{15} - %msg%n'
#logging.pattern.file=
|
第二章-web开发
1静态资源
IDEA中按两次shift键查找WebMvcAutoConfiguration类,查看addResourceHandlers方法
我们看到“/webjars/**”。
Webjars本质就是以jar包的方式引入我们的静态资源 , 我们以前要导入一个静态资源文件,直接导入即可。
使用SpringBoot需要使用Webjars,我们可以去搜索一下:
网站:https://www.webjars.org
要使用jQuery,我们只要要引入jQuery对应版本的pom依赖即可!
然后查看其中的this.mvcProperties.getStaticPathPattern();方法,发现返回值为”**”
进入if (!registry.hasMappingForPattern(staticPathPattern))条件后,发现方法中his.resourceProperties.getStaticLocations())的返回值有4个,这4个地方默认放置静态资源
1
2
3
4
|
new String[]{"classpath:/META-INF/resources/",
"classpath:/resources/",
"classpath:/static/",
"classpath:/public/"
|
测试: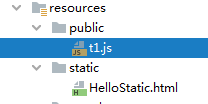 http://localhost:8080/t1.js可以访问到资源
它们的优先级为resources>static>public
自定义路径
我们也可以自己通过配置文件来指定一下,哪些文件夹是需要我们放静态资源文件的,在application.properties中配置;
1
|
spring.resources.static-locations=classpath:/coding/,classpath:/kuang/
|
一旦自己定义了静态文件夹的路径,原来的自动配置就都会失效了!
2首页定制/图标
IDEA中按两次shift键查找WebMvcAutoConfiguration类,查看welcomePageHandlerMapping方法
其中调用了getWelcomePage()方法
1
2
3
4
5
6
7
8
9
10
11
12
13
|
private Optional<Resource> getWelcomePage() {
String[] locations = getResourceLocations(this.resourceProperties.getStaticLocations());
// ::是java8 中新引入的运算符
// Class::function的时候function是属于Class的,应该是静态方法。
// this::function的funtion是属于这个对象的。
// 简而言之,就是一种语法糖而已,是一种简写
return Arrays.stream(locations).map(this::getIndexHtml).filter(this::isReadable).findFirst();
}
// 欢迎页就是一个location下的的 index.html 而已
private Resource getIndexHtml(String location) {
return this.resourceLoader.getResource(location + "index.html");
}
|
欢迎页,静态资源文件夹下的所有 index.html 页面;被 /** 映射。
比如我访问 http://localhost:8080/ ,就会找静态资源文件夹下的 index.html
新建一个 index.html ,在我们上面的3个目录中任意一个;然后访问测试 http://localhost:8080/ 看结果!
图标:把图片放在static在,head标签下引用<link rel="icon" type="image/x-icon" href="favicon1.icon" />
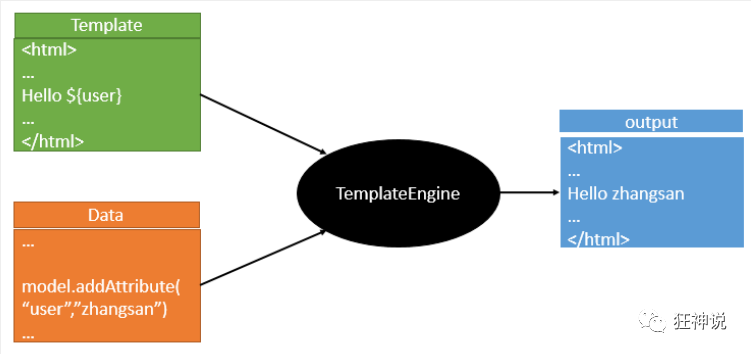
3模版引擎
模板引擎,我们其实大家听到很多,其实jsp就是一个模板引擎,还有用的比较多的freemarker,包括SpringBoot给我们推荐的Thymeleaf,模板引擎有非常多,但再多的模板引擎,他们的思想都是一样的,什么样一个思想呢我们来看一下这张图:
导入模版引擎
1
2
3
4
5
|
<!--thymeleaf-->
<dependency>
<groupId>org.springframework.boot</groupId>
<artifactId>spring-boot-starter-thymeleaf</artifactId>
</dependency>
|
前面呢,我们已经引入了Thymeleaf,那这个要怎么使用呢?
按照SpringBoot的自动配置原理看Thymeleaf的自动配置规则,在按照那个规则,进行使用。
找一下Thymeleaf的自动配置类:ThymeleafProperties
1
2
3
4
5
6
7
8
9
10
11
12
13
14
|
@ConfigurationProperties(
prefix = "spring.thymeleaf"
)
public class ThymeleafProperties {
private static final Charset DEFAULT_ENCODING;
public static final String DEFAULT_PREFIX = "classpath:/templates/";
public static final String DEFAULT_SUFFIX = ".html";
private boolean checkTemplate = true;
private boolean checkTemplateLocation = true;
private String prefix = "classpath:/templates/";
private String suffix = ".html";
private String mode = "HTML";
private Charset encoding;
}
|
快速开始
我们可以在其中看到默认的前缀和后缀!
我们只需要把我们的html页面放在类路径下的templates下,thymeleaf就可以帮我们自动渲染了。
使用thymeleaf什么都不需要配置,只需要将他放在指定的文件夹下即可!
1java类
1
2
3
4
5
6
7
8
|
@Controller
public class April {
@RequestMapping("/April")
public String hello(){
System.out.println("========");
return "April";
}
}
|
2、编写一个测试页面 test.html 放在 templates 目录下
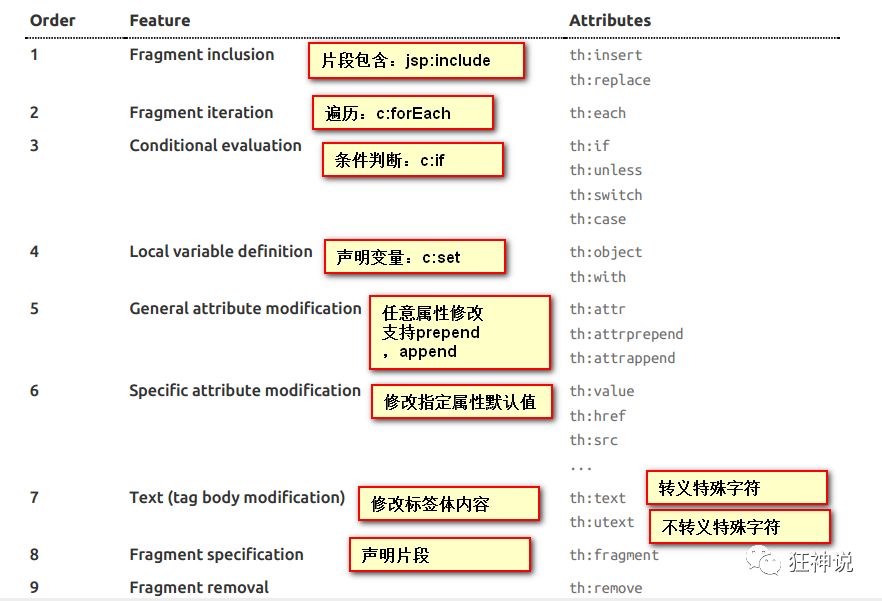
thymeleaf
官网教程https://www.thymeleaf.org/doc/tutorials/3.0/usingthymeleaf.html#what-is-thymeleaf
导入命名空间<html xmlns:th="http://www.thymeleaf.org">
1java类
1
2
3
4
5
6
7
8
9
|
@Controller
public class April {
@RequestMapping("/April")
public String hello(Model model){
System.out.println("========");
model.addAttribute("name","lusenlin");
return "April";
}
}
|
2static下的April.html
1
2
3
4
5
6
7
8
9
10
11
12
13
14
15
16
17
18
19
20
21
22
23
24
25
26
|
<!DOCTYPE html>
<html lang="en" xmlns:th="http://www.thymeleaf.org">
<head>
<meta charset="UTF-8">
<title>Title</title>
</head>
<body>
<!--th:text就是将div中的内容设置为它指定的值,和之前学习的Vue一样-->
<div th:text="${name}"></div>
<div th:text="${msg}"></div>
<!--非text-->
<div th:utext="${msg}"></div>
<!--遍历数据-->
<!--th:each每次遍历都会生成当前这个标签:官网#9-->
<h4 th:each="user :${users}" th:text="${user}"></h4>
<h4>
<!--行内写法:官网#12-->
<span th:each="user:${users}">[[${user}]]</span>
</h4>
</body>
</html>
|
可以使用任意的 th:attr 来替换Html中原生属性的值!
4格式化器/扩展SpringMVC
找到 WebMvcAutoConfiguration 查看其中getDateFormat(),查看默认日期格式,为dd/MM/yyyy
表单提交的日期格式必须是yyyy/MM/dd的格式,可以在配置文件中修改格式
1
|
spring.mvc.date-format=yyyy-MM-dd
|
我们要做的就是编写一个@Configuration注解类,并且类型要为WebMvcConfigurer,还不能标注@EnableWebMvc注解;我们去自己写一个;我们新建一个包叫config,写一个类MyMvcConfig;
1
2
3
4
5
6
7
8
9
10
|
//应为类型要求为WebMvcConfigurer,所以我们实现其接口
//可以使用自定义类扩展MVC的功能
@Configuration
public class MyMvcConfig implements WebMvcConfigurer {
@Override
public void addViewControllers(ViewControllerRegistry registry) {
// 浏览器发送/test , 就会跳转到test页面;
registry.addViewController("/test").setViewName("test");
}
}
|
5CRUD/webjars
基于模版引擎,静态依赖放在static目录下。
也可以通过webjars去查找https://www.webjars.org/,以pom的方式导入
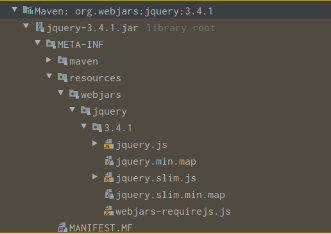
访问地址为http://localhost:8080/webjars/jquery/3.4.1/jquery.js
以pom方式导入,在使用时引用,用thymeleaf语法,可以自动引用当前项目名称,在以后进行修改项目名称时,以达到解耦目的。
1
2
3
4
5
|
<!-- 原来 <link href="asserts/css/bootstrap.min.css" rel="stylesheet">-->
<link th:href="@{/webjars/bootstrap/4.1.0/css/bootstrap.min.css}" th:rel="stylesheet">
<!--引入自己的静态css样式 -->
<link th:href="@{/asserts/css/signin.css}" rel="stylesheet">
|
此时若在properties或者yml中修改项目访问路径,那么使用上面方法就不需要去修改访问名称了。
server.context-path=/hello
1国际化
resource下创建i18n文件夹存放配置文件,文件名格式为基础名(login)+语言代码(zh)+国家代码(CN)
先创建一个login.properties
再创建文件格式名称的文件 如:login_en_CN.properties
可以添加其他语言的文件,login_en_US.properties
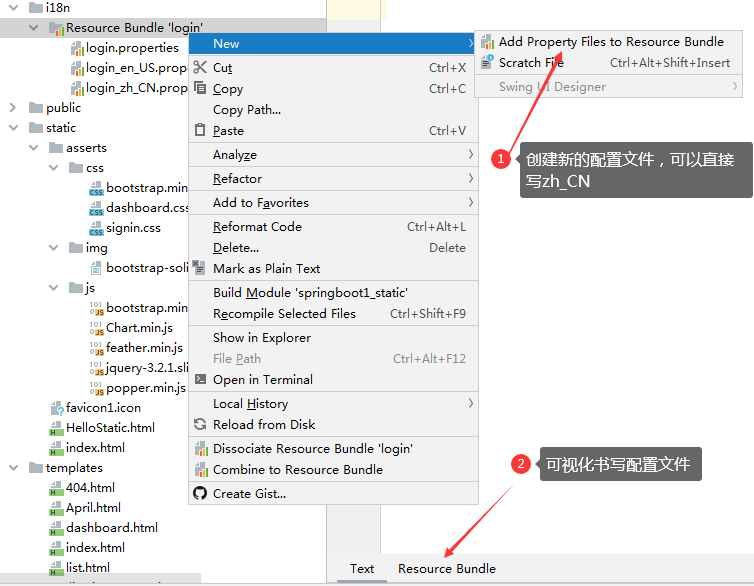
点击Resource Bundle可以快速编写配置文件,login.properties指的是,若没有国际化配置,就默认使用login.properties
1
2
3
4
5
|
#编写的默认值
login.password=密码
login.remember=记住我
login.tip=请登录
login.username=用户名
|
配置文件如何生效?
查找MessageSourceAutoConfiguration里面有一个方法messageSource,这里发现SpringBoot已经自动配置好了管理我们国际化资源文件的组件 ResourceBundleMessageSource;
在application.properties配置文件中添加国际化文件的位置和基础名
1
|
spring.messages.basename=i18n.login
|
如果配置文件中没有配置基础名,就在类路径下找基础名为message的配置文件
html中使用:用#{} ,[[#{login.xx}]]
1
2
3
4
5
|
行内使用
<h1 class="h3 mb-3 font-weight-normal" th:text="#{login.tip}"></h1>
行外使用
<input type="checkbox" value="remember-me"> [[#{login.remember}]]
|
点击链接切换国际化
1
2
3
|
<!-- thymeleaf模版引擎 这里传入参数不需要使用 ?使用 (key=value)-->
<a class="btn btn-sm" th:href="@{/index.html(l='zh_CN')}">中文</a>
<a class="btn btn-sm" th:href="@{/index.html(l='en_US')}">English</a>
|
1自己实现区域信息解析器
 1
 2
 3
 4
 5
 6
 7
 8
 9
10
11
12
13
14
15
16
17
18
19
20
21
22
23
24
25
26
27
28
29
30
31
32
33
34
|
package com.lx.component;
import org.springframework.util.StringUtils;
import org.springframework.web.servlet.LocaleResolver;
import javax.servlet.http.HttpServletRequest;
import javax.servlet.http.HttpServletResponse;
import java.util.Locale;
public class MyLocaleResolver implements LocaleResolver {
@Override
public Locale resolveLocale(HttpServletRequest httpServletRequest) {
//获取请求参数中的语言
String language = httpServletRequest.getParameter("l");
//没带区域信息参数就用系统默认的
Locale locale = Locale.getDefault();
if (!StringUtils.isEmpty(language)) {
//提交的参数是zh_CN (语言代码_国家代码)
String[] s = language.split("_");
locale = new Locale(s[0], s[1]);
}
return locale;
}
@Override
public void setLocale(HttpServletRequest httpServletRequest, HttpServletResponse httpServletResponse, Locale locale) {
}
}
|
2在配置类中将其注册到容器中
 1
 2
 3
 4
 5
 6
 7
 8
 9
10
11
12
13
14
15
16
17
18
19
20
21
22
23
24
|
package com.lx.cofig;
import com.lx.component.MyLocaleResolver;
import org.springframework.context.annotation.Bean;
import org.springframework.context.annotation.Configuration;
import org.springframework.web.servlet.LocaleResolver;
import org.springframework.web.servlet.config.annotation.ViewControllerRegistry;
import org.springframework.web.servlet.config.annotation.WebMvcConfigurer;
@Configuration
public class MyMvcConfig implements WebMvcConfigurer {
@Override
public void addViewControllers(ViewControllerRegistry registry) {
// registry.addViewController("/").setViewName("login");
}
@Bean
//import org.springframework.web.servlet.LocaleResolver;
public LocaleResolver localeResolver() {
return new MyLocaleResolver();//区域信息解析器
}
}
|
2拦截/验证
1
2
|
<!-- 用来设置提示消息,strings.isEmpty()判断是否为空 -->
<p th:text="${msg}" th:if="${not #strings.isEmpty(msg)}"></p>
|
用户首先发起请求,进入拦截器。
1
2
3
4
5
6
7
8
9
10
11
12
13
14
|
package com.lx.cofig;
import org.springframework.web.servlet.HandlerInterceptor;
public class MyIntercepter implements HandlerInterceptor {
@Override
public boolean preHandle(HttpServletRequest request, HttpServletResponse response, Object handler) throws Exception {
Object user= request.getSession().getAttribute("loginUser");
System.out.println("拦截器啊"+request.getRequestURL());
if(user ==null){
response.sendRedirect("index");//页面为/index 需要在webMVC配置中进行设置
return false;
}
return true;
}
}
|
注册拦截器
在使用spring2.0+时,配置拦截器之后,我们要把静态资源的路径加入到不拦截的路径之中。
1
2
3
4
5
6
7
8
9
10
11
12
13
14
15
16
17
18
19
20
21
22
23
|
package com.lx.cofig;
import com.lx.component.MyLocaleResolver;
import org.springframework.context.annotation.Bean;
import org.springframework.context.annotation.Configuration;
import org.springframework.web.servlet.LocaleResolver;
@Configuration
public class MyMvcConfig implements WebMvcConfigurer {
@Override
public void addViewControllers(ViewControllerRegistry registry) {
registry.addViewController("/list.html").setViewName("list");
registry.addViewController("/index").setViewName("index");
}
@Override
public void addInterceptors(InterceptorRegistry registry) {
//先添加拦截器
//addPathPatterns("/**")拦截拦截请求
//excludePathPatterns()排除一些请求
registry.addInterceptor(new MyIntercepter())
.addPathPatterns("/**").
excludePathPatterns("/index.html","/index","/account/login","/asserts/**","/webjars/**");
}
}
|
在controller进行验证帐号密码,
1
2
3
4
5
6
7
8
9
10
|
@RequestMapping("/login")
public String login(Account account, Model model, HttpServletRequest request){
if(account!=null && account.getAccount()!=null && "123".equals(account.getAccount())){
System.out.println("成功"+account);
request.getSession().setAttribute("loginUser","11");
return "redirect:/list.html";
}
model.addAttribute("msg","帐号或密码错误");
return "index";
}
|
修改页面立刻生效
1
2
|
#禁用缓存
spring.thymeleaf.cache=false
|
在页面修改完成以后按快捷键ctrl+f9,重新编译;
3Rest风格/公告页面抽取
使用rest风格,在templates下新建一个emp文件夹(staff也可),controller中返回staff/list
| 实验功能 |
请求URI |
请求方式 |
| 查询所有员工 |
emps |
GET |
| 查询某个员工(来到修改页面) |
emp/1 |
GET |
| 来到添加页面 |
emp |
GET |
| 添加员工 |
emp |
POST |
| 来到修改页面(查出员工进行信息回显) |
emp/1 |
GET |
| 修改员工 |
emp |
PUT |
| 删除员工 |
emp/1 |
DELETE |
th:insert:将公共片段整个插入到声明引入的元素中th:replace:将声明引入的元素替换为公共片段th:include:将被引入的片段的内容包含进这个标签中
1
2
3
4
5
6
7
8
9
10
|
/*公共代码片段*/
<footer th:fragment="copy">
© 2011 The Good Thymes Virtual Grocery
</footer>
/*引用代码片段*/
<div th:insert="~{footer :: copy}"></di
/*(〜{...}包围是完全可选的,所以上⾯的代码 将等价于:*/
<div th:insert="footer :: copy"></di
|
传递数值
1
2
3
4
5
6
7
8
|
/*或者在定义代码片段时,定义参数*/
<nav th:fragment="topbar(A,B)"
/*引入时直接传递参数*/
~{templatename::fragmentname(A值,B值)}
<!--例子:引用时传递数值-->
<div th:insert="~{component/components :: navLeft(active='dashboard.html')}"></div>
|
4CRUD/页面错误处理
特定格式显示日期:<td th:text="${#dates.format(staff.birth,'yyyy-MM-dd')}"></td>
1
2
|
<!--@{/staff}加上/斜杠 可以避免转发带来的路径错误 -->
<form th:action="@{/staff}" method="post">
|
1
2
3
4
5
|
//Controller Rest风格
@RequestMapping(value = "/toUpdateStaff/{id}")
public String toUpdateStaff(@PathVariable Integer id, Model model){
return "staff/update";
}
|
错误处理:在template下新建一个error文件夹,然后404错误页面就写一个404.html。
6跨域
1
2
3
4
5
6
7
8
9
10
11
12
13
14
15
16
17
18
19
20
21
22
23
24
25
26
|
package com.lx.config;
import org.springframework.context.annotation.Bean;
import org.springframework.context.annotation.Configuration;
import org.springframework.web.cors.CorsConfiguration;
import org.springframework.web.cors.UrlBasedCorsConfigurationSource;
import org.springframework.web.filter.CorsFilter;
@Configuration
public class MyConfiguration {
private CorsConfiguration buildConfig() {
CorsConfiguration corsConfiguration = new CorsConfiguration();
corsConfiguration.addAllowedOrigin("*"); //允许任何域名
corsConfiguration.addAllowedHeader("*"); //允许任何头
corsConfiguration.addAllowedMethod("*"); //允许任何方法
return corsConfiguration;
}
@Bean
public CorsFilter corsFilter() {
UrlBasedCorsConfigurationSource source = new UrlBasedCorsConfigurationSource();
source.registerCorsConfiguration("/**", buildConfig()); //注册
return new CorsFilter(source);
}
}
|
第三章-SpringData
1什么是SpringData
对于数据访问层,无论是 SQL(关系型数据库) 还是 NOSQL(非关系型数据库),Spring Boot 底层都是采用 Spring Data 的方式进行统一处理。
Spring Boot 底层都是采用 Spring Data 的方式进行统一处理各种数据库,Spring Data 也是 Spring 中与 Spring Boot、Spring Cloud 等齐名的知名项目。
Sping Data 官网:https://spring.io/projects/spring-data
数据库相关的启动器 :可以参考官方文档:
https://docs.spring.io/spring-boot/docs/2.2.5.RELEASE/reference/htmlsingle/#using-boot-starter
整合JDBC
新建一个项目测试:springboot-data-jdbc ; 引入相应的模块!基础模块
Spring Web 、 JDBC API 、MySQL Driver
新建一个application.yml配置文件
1
2
3
4
5
6
|
spring:
datasource:
username: root
password: 123456
url: jdbc:mysql://localhost:3306/mysql1?serverTimezone=UTC&useUnicode=true&characterEncoding=utf-8
driver-class-name: com.mysql.jdbc.Driver
|
测试类中测试
1
2
3
4
5
6
7
8
9
10
11
12
13
14
15
16
17
18
19
20
21
22
23
24
25
26
27
|
package com.lx;
import org.junit.jupiter.api.Test;
import org.springframework.beans.factory.annotation.Autowired;
import org.springframework.boot.test.context.SpringBootTest;
@SpringBootTest
class Springboot2DataApplicationTests {
@Autowired
DataSource datasource;
@Test
void contextLoads() throws SQLException {
//默认数据源为class com.zaxxer.hikari.HikariDataSource
System.out.println(datasource.getClass()+"查看默认数据源");
//获得连接
Connection connection = datasource.getConnection();
PreparedStatement ps=connection.prepareStatement("select * from staff");
ResultSet resultSet = ps.executeQuery();
while (resultSet.next()){
System.out.println(resultSet.getInt("id")+" "+resultSet.getString("name"));
}
connection.close();
}
}
|
JDBCTemplate
1、有了数据源(com.zaxxer.hikari.HikariDataSource),然后可以拿到数据库连接(java.sql.Connection),有了连接,就可以使用原生的 JDBC 语句来操作数据库;
2、即使不使用第三方第数据库操作框架,如 MyBatis等,Spring 本身也对原生的JDBC 做了轻量级的封装,即JdbcTemplate。
3、数据库操作的所有 CRUD 方法都在 JdbcTemplate 中。
4、Spring Boot 不仅提供了默认的数据源,同时默认已经配置好了 JdbcTemplate 放在了容器中,程序员只需自己注入即可使用
5、JdbcTemplate 的自动配置是依赖 org.springframework.boot.autoconfigure.jdbc 包下的 JdbcTemplateConfiguration 类
JdbcTemplate主要提供以下几类方法:
- execute方法:可以用于执行任何SQL语句,一般用于执行DDL语句;
- update方法及batchUpdate方法:update方法用于执行新增、修改、删除等语句;batchUpdate方法用于执行批处理相关语句;
- query方法及queryForXXX方法:用于执行查询相关语句;
- call方法:用于执行存储过程、函数相关语句。
 1
 2
 3
 4
 5
 6
 7
 8
 9
10
11
12
13
14
15
16
17
18
19
20
21
22
23
24
25
26
27
28
29
30
31
32
33
34
35
36
37
38
39
40
41
42
43
44
45
46
47
48
49
|
package com.lx.controller;
import org.springframework.beans.factory.annotation.Autowired;
import org.springframework.jdbc.core.JdbcTemplate;
import org.springframework.web.bind.annotation.GetMapping;
@RestController
@RequestMapping("/jdbc")
public class JdbcController {
/**
* Spring Boot 默认提供了数据源,默认提供了 org.springframework.jdbc.core.JdbcTemplate
* JdbcTemplate 中会自己注入数据源,用于简化 JDBC操作
* 还能避免一些常见的错误,使用起来也不用再自己来关闭数据库连接
*/
@Autowired
JdbcTemplate jdbcTemplate;
//查询 List 中的1个 Map 对应数据库的
// 1行数据 Map 中的 key 对应数据库的字段名,value 对应数据库的字段值
@GetMapping("/staffs")
public List<Map<String,Object>> staffList(){
String sql="select * from staff";
List<Map<String,Object>> maps=jdbcTemplate.queryForList(sql);
return maps;
}
//添加
@GetMapping("/addStaff")
public String addStaff(){
String sql="insert into staff values('xxx',null,'明1明',13,'2012/1/5',null,null)";
jdbcTemplate.update(sql);
return "OK";
}
//修改
@GetMapping("/updateStaff/{id}")
public String updateStaff(@PathVariable Integer id){
String sql="update staff set name='周小舟' where id=?";
jdbcTemplate.update(sql,id);
return "update ok";
}
//删除
@GetMapping("/deleteStaff/{id}")
public String deleteStaff(@PathVariable Integer id){
String sql="delete from staff where id=?";
jdbcTemplate.update(sql,id);
return "update ok";
}
}
|
2整合Druid数据源
选择哪个数据库连接池
- DBCP2 是 Appache 基金会下的项目,是最早出现的数据库连接池 DBCP 的第二个版本。
- C3P0 最早出现时是作为 Hibernate 框架的默认数据库连接池而进入市场。
- Druid 是阿里巴巴公司开源的一款数据库连接池,其特点在于有丰富的附加功能。
- HikariCP 相较而言比较新,它最近两年才出现,据称是速度最快的数据库连接池。最近更是被 Spring 设置为默认数据库连接池。
不选择 C3P0 的原因:
- C3P0 的 Connection 是异步释放。这个特性会导致释放的在某些情况下 Connection 实际上 still in use ,并未真正释放掉,从而导致连接池中的 Connection 耗完,等待状况。
- Hibernate 现在对所有数据库连接池一视同仁,官方不再指定『默认』数据库连接池。因此 C3P0 就失去了『官方』光环。
不选择 DBCP2 的原因:
- 相较于 Druid 和 HikariCP,DBCP2 没有什么特色功能/卖点。基本上属于
能用,没毛病 的情况,地位显得略有尴尬。
1 在 Spring Boot 项目中加入druid-spring-boot-starter依赖 (点击查询最新版本)
1
2
3
4
5
|
<dependency>
<groupId>com.alibaba</groupId>
<artifactId>druid-spring-boot-starter</artifactId>
<version>1.1.21</version>
</dependency>
|
2在配置文件中指定数据源类型(Spring Boot 2.0 以上默认使用 com.zaxxer.hikari.HikariDataSource 数据源,但可以 通过 spring.datasource.type 指定数据源。)
1
2
3
4
5
6
7
8
9
10
11
12
13
14
15
16
17
18
19
20
21
22
23
24
25
26
27
28
29
30
31
32
33
34
35
36
|
spring:
datasource:
username: root
password: 123456
url: jdbc:mysql://localhost:3306/mysql1?serverTimezone=UTC&useUnicode=true&characterEncoding=utf-8
driver-class-name: com.mysql.jdbc.Driver
type: com.alibaba.druid.pool.DruidDataSource # 自定义数据源
druid:
# 连接池配置
# 配置初始化大小、最小、最大
initial-size: 1
min-idle: 1
max-active: 20
# 配置获取连接等待超时的时间
max-wait: 3000
validation-query: SELECT 1 FROM DUAL
test-on-borrow: false
test-on-return: false
test-while-idle: true
pool-prepared-statements: true
time-between-eviction-runs-millis: 60000
min-evictable-idle-time-millis: 300000
#配置监控统计拦截的filters,stat:监控统计、log4j:日志记录、wall:防御sql注入
filters: stat,wall,slf4j
# 配置web监控,默认配置也和下面相同(除用户名密码,enabled默认false外),其他可以不配
web-stat-filter:
enabled: true
url-pattern: /*
exclusions: "*.js,*.gif,*.jpg,*.png,*.css,*.ico,/druid/*"
stat-view-servlet:
enabled: true
url-pattern: /druid/* #路径
login-username: admin #帐号和密码
login-password: 123456
allow: 127.0.0.1 #设置能够访问的地址
|
3整合mybatis
首先确定数据源
新建项目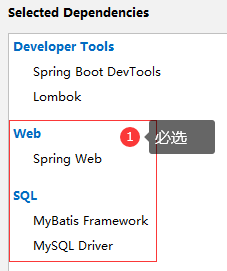 若选择Mybatis,springboot会自懂导入下面的依赖
1、导入 MyBatis 所需要的依赖
1
2
3
4
5
6
|
<dependency>
<groupId>org.mybatis.spring.boot</groupId>
<artifactId>mybatis-spring-boot-starter</artifactId>
<version>2.1.1</version>
</dependency>
|
2com.lx.mapper新建StaffMapper 接口
启动类使用@MapperScan(“com.lx.mapper”)就不用在这里使用@Mapper注解了
意思是为扫描mapper,为接口注入实现类
 1
 2
 3
 4
 5
 6
 7
 8
 9
10
11
12
13
14
15
16
17
18
|
package com.lx.mapper;
import com.lx.vo.Staff;
import org.apache.ibatis.annotations.Mapper;
import org.springframework.stereotype.Repository;
import java.util.List;
//@Mapper 启动类使用@MapperScan("com.lx.mapper")就不用在这里使用mapper注解了
//mapper说明这是一个mabatis的mapper类 dao
@Repository
public interface StaffMapper {
List<Staff> queryStaffList();
Staff queryStaffById(Integer id);
boolean updateStaff(Staff staff);
boolean deleteStaff(Integer id);
}
|
6、resources下新建mabatis 然后建立对应的Mapper映射文件 DepartmentMapper.xml
1
2
3
4
5
6
7
8
9
10
11
12
13
14
15
16
|
<?xml version="1.0" encoding="UTF-8" ?>
<!DOCTYPE mapper
PUBLIC "-//mybatis.org//DTD Mapper 3.0//EN"
"http://mybatis.org/dtd/mybatis-3-mapper.dtd">
<mapper namespace="com.kuang.mapper.DepartmentMapper">
<select id="getDepartments" resultType="Department">
select * from department;
</select>
<select id="getDepartment" resultType="Department" parameterType="int">
select * from department where id = #{id};
</select>
</mapper>
|
application.yml文件进行mybatis配置
1
2
3
4
|
#整合mybatis
mybatis:
type-aliases-package: com.lx.vo
mapper-locations: classpath:mybatis/mapper/*.xml
|
可能出现资源过滤问题 ,pom.xml设置
1
2
3
4
5
6
7
8
9
|
<resources>
<resource>
<directory>src/main/java</directory>
<includes>
<include>**/*.xml</include>
</includes>
<filtering>true</filtering>
</resource>
</resources>
|
4整合jpa
一、SpringBootData JPA介绍
SpringData:其实SpringData就是Spring提供了一个操作数据的框架。而SpringData JPA只是SpringData框架下的一个基于JPA标准操作数据的模块。
SpringData JPA:基于JPA的标准数据进行操作。简化操作持久层的代码。只需要编写接口就可以。
1加入依赖
 1
 2
 3
 4
 5
 6
 7
 8
 9
10
11
12
13
14
15
16
17
18
19
20
21
22
23
|
<!--springBoot依赖 tomcat,dispatcherServlet,xml -->
<dependency>
<groupId>org.springframework.boot</groupId>
<artifactId>spring-boot-starter-web</artifactId>
</dependency>
<!--开启热部署-->
<dependency>
<groupId>org.springframework.boot</groupId>
<artifactId>spring-boot-devtools</artifactId>
<optional>true</optional>
</dependency>
<dependency>
<groupId>mysql</groupId>
<artifactId>mysql-connector-java</artifactId>
</dependency>
<!--springData JPA启动器-->
<dependency>
<groupId>org.springframework.boot</groupId>
<artifactId>spring-boot-starter-data-jpa</artifactId>
</dependency>
|
2设置实体类、写dao方法、
physical-strategy: org.hibernate.boot.model.naming.PhysicalNamingStrategyStandardImpl yml中让实体类 映射 表不进行驼峰转换。(默认 表名empNmae会转为emp_name)
1
2
3
4
5
6
7
8
9
10
11
12
13
14
15
16
17
18
19
20
21
22
23
24
25
26
27
28
29
30
31
32
33
34
|
//注意jpa,使用Table()无法用name处理表名不一致的问题
@Entity(name = "zz_account")
public class Account {
@Id //主键id
@GeneratedValue(strategy= GenerationType.IDENTITY)//主键生成策略
private Integer aid;
}
//写一个dao方法
public interface AccountDao extends JpaRepository<Account, Serializable> {
//注解查询
@Query("select a from zz_account a where a.username like %:name%")
public List<Account> findAccountByUsername(@Param("name")String username);
}
//进行调用
@RestController
public class hello {
@Autowired
AccountDao accountDao;
@RequestMapping("/")
public List<Account> hello(){
return accountDao.findAll();
}
}
//分页
//分页
int currentPage=0;//当前页从0开始
int pageSize=3;//每页3个
PageRequest page=PageRequest.of(currentPage,pageSize);
Page<Account> all = accountDao.findAll(page);
|
5整合redis
加入redis.jar
1
2
|
<groupId>org.springframework.boot</groupId>
<artifactId>spring-boot-starter-data-redis</artifactId>
|
1
2
3
4
5
6
7
8
9
10
|
spring:
redis:
host: 127.0.0.1
port: 6379
timeout: 5000
jedis:
pool:
max-active: 100 #最大连接
max-idle: 5 #最大空闲
time-between-eviction-runs: 60000 #运行期间的回收时间
|
若只使用redisTemplate只需要加入注解@Autowired就好
若使用redis注解,启动类需要开启注解@Enablecaching
==使用注解时注意,key中的引号==
 1
 2
 3
 4
 5
 6
 7
 8
 9
10
11
12
13
14
15
16
17
18
19
20
21
22
23
24
|
@Autowired
RedisTemplate redisTemplate;
@Override
public void addName(Integer id) {
redisTemplate.opsForValue().set("hello🆔"+id,id);
}
@Override
@Cacheable(value = "helloService",key="'hello🆔'+#id")
public Integer findId(Integer id){
HashMap<Integer,Integer> map=new HashMap();
map.put(1,1111);
map.put(2,2222);
map.put(3,3333);
System.out.println("通过数据库查找 key为:"+id);
return map.get(id);
}
@Override
@CacheEvict(value = "helloService",key="'hello🆔'+#id")
public Integer updateHello(Integer id){
System.out.println("删除在redis中key为:"+id);
return 100;
}
|
6整合日志/AOP
利用AOP为所有@service添加日志
加日志,只需要 加入jar、Properties文件、java类中使用。
加入AOP.jar
1
2
|
<groupId>org.springframework.boot</groupId>
<artifactId>spring-boot-starter-aop</artifactId>
|
1
2
3
4
5
6
7
8
9
10
11
12
13
14
15
16
17
18
19
20
21
22
23
24
25
26
27
|
package lsl.loghandler;
import org.apache.log4j.Logger;
import org.aspectj.lang.JoinPoint;
import org.aspectj.lang.annotation.Aspect;
import org.aspectj.lang.annotation.Before;
import org.aspectj.lang.reflect.MethodSignature;
import org.springframework.stereotype.Component;
import java.lang.reflect.Method;
@Aspect
@Component
public class MyLogHandler {
Logger logger=Logger.getLogger(MyLogHandler.class);
@Before("execution(public * lsl.service..*(..))")
public void addLogForService(JoinPoint point){
MethodSignature signature= (MethodSignature) point.getSignature();
Method method=signature.getMethod();//获得当前被拦截方法
String methodName=method.getName();//获得被拦截方法名
System.out.println("~~~~~"+methodName);
Object target = point.getTarget();//获得类名
logger.info(methodName);
}
}
|
7整合mybatis-plus
1
2
3
4
5
6
7
|
<!--mybatis-plus自动的维护了mybatis以及mybatis-spring的依赖,
在springboot中这三者不能同时的出现,避免版本的冲突,表示:跳进过这个坑-->
<dependency>
<groupId>com.baomidou</groupId>
<artifactId>mybatis-plus-boot-starter</artifactId>
<version>3.1.1</version>
</dependency>
|
1
2
|
//app启动类
@MapperScan("com.lx.mapper")//扫描dao
|
 1
 2
 3
 4
 5
 6
 7
 8
 9
10
11
12
13
14
15
16
17
18
19
20
21
22
23
24
25
26
27
|
server:
port: 8080
servlet:
context-path: /
spring:
datasource:
username: root
password: 123456
url: jdbc:mysql://localhost:3306/mysql1?useUnicode=true&characterEncoding=utf-8&useSSL=true&serverTimezone=UTC
driver-class-name: com.mysql.cj.jdbc.Driver
mybatis-plus:
global-config:
db-config:
id-type: auto
field-strategy: not_empty
table-underline: true
db-type: mysql
logic-delete-value: 1 # 逻辑已删除值(默认为 1)
logic-not-delete-value: 0 # 逻辑未删除值(默认为 0)
mapper-locations: classpath:com/lx/mapper/xml/*Mapper.xml
config-location: classpath:mybatis-config.xml
type-aliases-package: com.lx.vo
#config-location和configuration只能存在一个
configuration:
#打印sql语句
log-impl: org.apache.ibatis.logging.stdout.StdOutImpl
|
8事务/异常
事务注意:==Spring的事务是AOP的,也就是说,1开启事务 2执行锁内的代码 3释放锁 4提交事务==
在多线程情况下,线程A在开启线程,执行代码后释放锁,此时还没有提交,那么B线程现在已经读取到了数据。就会照成数据的’脏读’。
解决方案:
1扩大锁的范围,让锁包含事务。
2给Mysql数据库加乐观锁。(在sql语句后面加for update)
1
2
3
4
5
|
//启动类
@EnableTransactionManagement //开启事务注解
//service中使用
@Transactionl
|
全局异常的捕获
问题:我们返回给页面的数据不是统一的,1定义一个返回的类。
1
2
3
4
5
6
7
8
9
10
11
12
13
14
15
16
17
18
19
20
21
22
23
24
25
26
27
28
29
30
31
32
33
34
35
36
|
package com.lx.util;
import lombok.AllArgsConstructor;
import lombok.Data;
import lombok.NoArgsConstructor;
@Data
@AllArgsConstructor
@NoArgsConstructor
public class CommonResult<T> {
//404 not_found
private Integer code;
private String message;
private T data;
public static <T>CommonResult<T> getSuccess(T data){
return new CommonResult<T>(200,"成功",data);
}
public static <T>CommonResult<T> getFail(Integer code,String message){
return new CommonResult<T>(code,message,null);
}
}
////////需要接口定义同意的返回码 最好是枚举类
public interface ErrorInfo {
Integer SuccessCode=200;//成功
Integer UnauthorizedCode=401;//未经授权的
Integer ForbiddenCode=403;//禁止
Integer NotFoundCode=404;//没找到
String Success="成功";//成功
String Unauthorized ="未经授权的";//未经授权的
String Forbidden ="禁止";//禁止
String NotFound ="没找到";//没找到
}
|
2进行使用
1
2
3
4
5
6
7
8
9
10
|
ResultObj resultObj;
try {
List<ZzDepartment> zzDepartments= deptMapper.selectList(new QueryWrapper<>());
int a=5/0;
return ResultObj.getSuccess(zzDepartments);
} catch (Exception e) {
e.printStackTrace();
return ResultObj.getFail(ErrorMessageAndCode.notFoundCode,ErrorMessageAndCode.notFoundMsg);
}
|
3业务异常/和全局异常拦截
1
2
3
4
5
6
7
8
9
10
11
12
13
14
15
16
|
//自定义异常子类
@Data
@AllArgsConstructor
public class CustomException extends Exception {
Integer code;
String msg;
}
//========================
//抛出业务异常
if(((ArrayList)all.getData()).size()<50){
throw new CustomException(ErrorMessageAndCode.nameErrorCode,ErrorMessageAndCode.notFoundMsg+"sd");
}
|
 1
 2
 3
 4
 5
 6
 7
 8
 9
10
11
12
13
14
15
16
17
18
19
20
21
22
23
24
25
26
27
28
29
30
31
32
33
34
35
36
37
38
39
40
41
42
43
44
45
46
47
48
49
50
51
52
|
//全局异常拦截
//可以自定义异常子类进行异常判断
@ControllerAdvice
public class ErrorController {
@ResponseBody //以json数据返回
@ExceptionHandler(value = Exception.class)//拦截异常父类
public ResultObj globleExceptionHandle(Exception exception){
System.out.println("拦截异常"+new Date());
if(exception instanceof CustomException){
CustomException customException= (CustomException) exception;
return ResultObj.getFail(((CustomException) exception).getCode(),customException.getMsg());
}
return ResultObj.getFail(ErrorMessageAndCode.notFoundCode,ErrorMessageAndCode.notFound);
}
}
//=========以下为改良后的 添加了部署环境的设置,dev开发环境会有错误信息=====
package com.lx.common;
import org.springframework.beans.factory.annotation.Value;
import org.springframework.web.bind.annotation.ControllerAdvice;
import org.springframework.web.bind.annotation.ExceptionHandler;
import org.springframework.web.bind.annotation.ResponseBody;
import java.util.Arrays;
//全局异常拦截
//可以自定义异常子类进行异常判断
@ControllerAdvice
public class ErrorController {
@Value("${spring.profiles.active}")
String environment;
@ResponseBody //以json数据返回
@ExceptionHandler(value = Exception.class)//拦截异常父类 也可以拦截子类,然后下面放父类
public ResultObj globleExceptionHandle(Exception exception){
if("dev".equalsIgnoreCase(environment)) {
//若是开发环境 打印错误消息
exception.printStackTrace();
}
if(exception instanceof GlobalException){
GlobalException GlobalException= (GlobalException) exception;
return ResultObj.getFail(((GlobalException) exception).getCode(),GlobalException.getMsg());
}
ResultObj fail = ResultObj.getFail(ErrorInfo.NotImplementedCode,
ErrorInfo.NotImplemented);
return fail;
}
}
|
| 异常 |
方法 |
返回值 |
| java.lang.NullPointerException |
exception.getMessage() |
null |
|
exception.getLocalizedMessage() |
null |
|
toString |
java.lang.NullPointerException |
9上传下载
1上传 2下载
上传
1pom.xml加入Jar
1
2
3
4
5
6
|
<!-- 文件上传 -->
<dependency>
<groupId>commons-fileupload</groupId>
<artifactId>commons-fileupload</artifactId>
<version>1.3.3</version>
</dependency>
|
2修改yml配置文件
 1
 2
 3
 4
 5
 6
 7
 8
 9
10
|
Spring:
servlet:
multipart:
enabled: true
# 最大支持文件大小
max-file-size: 100MB
# 最大支持请求大小
max-request-size: 100MB
文件存储路径**
filepath: E:/MyCode/IntelliJ_IDEA_project/registration/src/main/resources/static/dockerImgs
|
3java类中使用
不管MultipartFile有没有这个参数名称,只要没有上传文件,就会为null
1
2
3
4
5
6
7
8
9
10
11
12
13
14
15
16
17
18
19
20
21
22
23
24
25
26
27
28
29
30
31
32
33
34
35
36
37
|
@RequestMapping("/doctor")
public class DoctorController {
//获取文件路径
@Value("${filepath}")
private String filepath;
@PostMapping("addDocker")
public ResultObj addDocker(Doctor doctor, MultipartFile prctureFile){
//获得此项目的绝对路径
String path=filepath;//通过配置文件写的路径 @Value("${filepath}") String filepath; 获得此项目的绝对路径
File file=new File(path);
if(!file.exists()){
//若这个文件夹不存在 就进行创建 可以不判断
file.mkdirs();
}
System.out.println("路径:"+path+" 对象:"+doctor.toString());
String fileName=prctureFile.getOriginalFilename();//获得文件名称
String lastName=fileName.substring(fileName.indexOf("."));//获得文件后缀 .img
String uuid= UUID.randomUUID().toString().replace("-", "");//生成uuid
String newName=uuid+lastName;//最后路径 可以保存到数据库
//保存图片
try {
org.apache.commons.io.FileUtils.copyInputStreamToFile(prctureFile.getInputStream(),new File(path+"/"+newName));
//也可new File(path,newFileName)
} catch (IOException e) {
e.printStackTrace();
}
doctor.setImages(newName);
//productDao.addProduct(product);
return null;
}
}
|
第四章-SpringSecurity
1安全框架
市面上存在比较有名的:Shiro,Spring Security !
Spring Security是一个功能强大且高度可定制的身份验证和访问控制框架。它实际上是保护基于spring的应用程序的标准。
Spring Security 是针对Spring项目的安全框架,也是Spring Boot底层安全模块默认的技术选型,他可以实现强大的Web安全控制,对于安全控制,我们仅需要引入 spring-boot-starter-security 模块,进行少量的配置,即可实现强大的安全管理!
记住几个类:
- WebSecurityConfigurerAdapter:自定义Security策略
- AuthenticationManagerBuilder:自定义认证策略
- @EnableWebSecurity:开启WebSecurity模式
Spring Security的两个主要目标是 “认证” 和 “授权”(访问控制)。
“认证”(Authentication)
身份验证是关于验证您的凭据,如用户名/用户ID和密码,以验证您的身份。
身份验证通常通过用户名和密码完成,有时与身份验证因素结合使用。
“授权” (Authorization)
授权发生在系统成功验证您的身份后,最终会授予您访问资源(如信息,文件,数据库,资金,位置,几乎任何内容)的完全权限。
这个概念是通用的,而不是只在Spring Security 中存在。
2基本登录权限
1导入jar
1
2
3
4
|
<dependency>
<groupId>org.springframework.boot</groupId>
<artifactId>spring-boot-starter-security</artifactId>
</dependency>
|
2编写基础配置类
1
2
3
4
5
6
7
8
9
10
11
12
13
14
15
16
17
18
19
20
21
22
23
24
25
26
27
28
29
30
31
32
33
34
35
36
37
38
39
40
41
42
43
44
45
46
47
|
package com.lx.config;
import org.springframework.security.config.annotation.authentication.builders.AuthenticationManagerBuilder;
import org.springframework.security.config.annotation.web.builders.HttpSecurity;
import org.springframework.security.config.annotation.web.builders.WebSecurity;
import org.springframework.security.config.annotation.web.configuration.EnableWebSecurity;
import org.springframework.security.config.annotation.web.configuration.WebSecurityConfigurerAdapter;
import org.springframework.security.crypto.bcrypt.BCryptPasswordEncoder;
@EnableWebSecurity // 开启WebSecurity模式
public class SecurityConfig extends WebSecurityConfigurerAdapter {
@Override
protected void configure(HttpSecurity http) throws Exception {
// super.configure(http);
// 定制请求的授权规则
// 首页所有人可以访问
http.authorizeRequests()
.antMatchers("/").permitAll()
.antMatchers("/level1/**").hasRole("vip1")
.antMatchers("/level2/**").hasRole("vip2")
.antMatchers("/level3/**").hasRole("vip3");
//没有权限默认到登录页面
http.formLogin();
}
@Override
protected void configure(AuthenticationManagerBuilder auth) throws Exception {
//super.configure(auth);
//认证
// 数据库 jdbcAuthentication()
// 内存inMemoryAuthentication()
//要想我们的项目还能够正常登陆,需要修改一下configure中的代码。我们要将前端传过来的密码进行某种方式加密
//spring security 官方推荐的是使用bcrypt加密方式。
auth.inMemoryAuthentication().passwordEncoder(new BCryptPasswordEncoder())
.withUser("lusenlin1").password(new BCryptPasswordEncoder().encode("123456")).roles("vip1")
.and()
.withUser("lusenlin2").password(new BCryptPasswordEncoder().encode("123456")).roles("vip2")
.and()
.withUser("lusenlin3").password(new BCryptPasswordEncoder().encode("123456")).roles("vip1","vip2","vip3");
}
}
|
3测试,我们可以使用这些账号登录进行测试!发现会报错!,是因为没有加密。
4进行注销,在配置文件中的 configure(HttpSecurity http) 方法进行注销,http.logout();
5、但是,我们想让他注销成功后,依旧可以跳转到首页,该怎么处理呢?
1
2
|
// .logoutSuccessUrl("/"); 注销成功来到首页
http.logout().logoutSuccessUrl("/");
|
6 sec:authorize="isAuthenticated()":是否认证登录!来显示不同的页面
Maven依赖:
1
2
3
4
5
6
|
<!-- https://mvnrepository.com/artifact/org.thymeleaf.extras/thymeleaf-extras-springsecurity4 -->
<dependency>
<groupId>org.thymeleaf.extras</groupId>
<artifactId>thymeleaf-extras-springsecurity5</artifactId>
<version>3.0.4.RELEASE</version>
</dependency>
|
7、修改我们的 前端页面
-
导入命名空间
-
1
|
xmlns:sec="http://www.thymeleaf.org/thymeleaf-extras-springsecurity5"
|
-
修改导航栏,增加认证判断
1
2
3
4
5
6
7
8
9
10
11
12
13
14
15
|
<!--如果未登录-->
<div sec:authorize="!isAuthenticated()">
<a class="item" th:href="@{/login}">
<i class="address card icon"></i> 登录
</a>
</div>
<!--如果已登录-->
<div sec:authorize="isAuthenticated()">
<a class="item">
<i class="address card icon"></i>
用户名:<span sec:authentication="principal.username"></span>
角色:<span sec:authentication="principal.authorities"></span>
</a>
</div>
|
8如果注销404了,就是因为它默认防止csrf跨站请求伪造,因为会产生安全问题,我们可以将请求改为post表单提交,或者在spring security中关闭csrf功能;我们试试:在 配置中增加 http.csrf().disable();
1
|
http.csrf().disable();//关闭csrf功能:跨站请求伪造,默认只能通过post方式提交logout请求
|
9开启记住我功能 //记住我 http.rememberMe().rememberMeParameter("remember");
3定制登录页
1、在刚才的登录页配置后面指定 loginpage
http.formLogin().loginPage("/toLogin”);
2、然后前端也需要指向我们自己定义的 login请求
1
2
3
|
<a class="item" th:href="@{/toLogin}">
<i class="address card icon"></i> 登录
</a>
|
3、我们登录,需要将这些信息发送到哪里,我们也需要配置,login.html 配置提交请求及方式,方式必须为post:
1
|
<form th:action="@{/login}" method="post">
|
4、这个请求提交上来,我们还需要验证处理,怎么做呢?我们可以查看formLogin()方法的源码!我们配置接收登录的用户名和密码的参数!
1
2
3
4
5
6
|
//没有权限默认到登录页面 ,若提交来的表单的字段名称不同,可以进行设置。 /toLogin自定义登录页面
http.formLogin()
.usernameParameter("username")
.passwordParameter("password")
.loginPage("/toLogin")
.loginProcessingUrl("/login"); // 登陆表单提交请求
|
5、在登录页增加记住我的多选框
1
|
<input type="checkbox" name="remember"> 记住我
|
完整的配置
 1
 2
 3
 4
 5
 6
 7
 8
 9
10
11
12
13
14
15
16
17
18
19
20
21
22
23
24
25
26
27
28
29
30
31
32
33
34
35
36
37
38
39
40
41
42
43
44
45
46
47
48
49
|
package com.lx.config;
@EnableWebSecurity // 开启WebSecurity模式
public class SecurityConfig extends WebSecurityConfigurerAdapter {


    @Override
    protected void configure(HttpSecurity http) throws Exception {
       // super.configure(http);
        // 定制请求的授权规则
        // 首页所有人可以访问
        http.authorizeRequests()
                .antMatchers("/").permitAll()
                .antMatchers("/level1/**").hasRole("vip1")
                .antMatchers("/level2/**").hasRole("vip2")
                .antMatchers("/level3/**").hasRole("vip3");

        //没有权限默认到登录页面  ,若提交来的表单的字段名称不同,可以进行设置。 /toLogin自定义登录页面
        //http.formLogin().loginPage("toLogin");
        http.formLogin()
                .usernameParameter("username")
                .passwordParameter("password")
                .loginPage("/toLogin")
                .loginProcessingUrl("/login"); // 登陆表单提交请求

        http.csrf().disable();//关闭csrf功能:跨站请求伪造,默认只能通过post方式提交logout请求

        //开启注销功能
        http.logout();

        http.rememberMe().rememberMeParameter("remember");
    }

    @Override
    protected void configure(AuthenticationManagerBuilder auth) throws Exception {
        //super.configure(auth);
        //认证
        // 数据库 jdbcAuthentication()
        // 内存inMemoryAuthentication()
        //要想我们的项目还能够正常登陆,需要修改一下configure中的代码。我们要将前端传过来的密码进行某种方式加密
        //spring security 官方推荐的是使用bcrypt加密方式。
        auth.inMemoryAuthentication().passwordEncoder(new BCryptPasswordEncoder())
                .withUser("lusenlin1").password(new BCryptPasswordEncoder().encode("123456")).roles("vip1")
                .and()
                .withUser("lusenlin2").password(new BCryptPasswordEncoder().encode("123456")).roles("vip2")
                .and()
                .withUser("lusenlin3").password(new BCryptPasswordEncoder().encode("123456")).roles("vip1","vip2","vip3");
    }
}
|