第一章-SpringMVC概述
1什么是SpringMVC
SpringMVC是一种基于Java 的实现MVC设计模型的请求驱动类型的轻量级Web框架。属于SpringFrameWork的后续产品,已经融合在Spring Web Flow里面。
小知识点:
classpath:用maven构建项目时候resource目录就是默认的classpath
classpath即为java文件编译之后的class文件的编译目录一般为web-inf/classes,
src下的web.xml在编译时也会复制到classPath下
405错误:请求方式(get/post)不正确
2入门案例
1创建项目+jar包。
IDEA项目:创建Project 类型为Maven ,以archetype /ɑːrkitaɪp/原形创建,选择Maven-archetype-webapp。
Eclipse项目:创建一个simpleMaven,右键这个项目,javaEETools加入web.xml。
https://mvnrepository.com去搜索Spring Web MVC 加入jar包。比如:
1
2
3
4
5
|
<dependency>
    <groupId>org.springframework</groupId>
    <artifactId>spring-webmvc</artifactId>
    <version>5.1.5.RELEASE</version>
</dependency>
|
2配置web.xml
 1
 2
 3
 4
 5
 6
 7
 8
 9
10
11
12
13
14
15
16
17
18
19
20
21
22
23
24
25
26
27
28
29
30
31
32
33
34
35
36
37
38
39
40
41
42
43
44
45
46
47
|
<?xml version="1.0" encoding="UTF-8"?>
<web-app xmlns:xsi="http://www.w3.org/2001/XMLSchema-instance"
         xmlns="http://java.sun.com/xml/ns/javaee"
         xsi:schemaLocation="http://java.sun.com/xml/ns/javaee http://java.sun.com/xml/ns/javaee/web-app_2_5.xsd"
         version="2.5">
  <display-name>Archetype Created Web Application</display-name>
  <!--   spring监听 可以不配置spring监听(不知道为原因) -->
  <context-param>
    <param-name>contextConfigLocation</param-name>
    <param-value>classpath:applicationContext.xml</param-value>
  </context-param>
  <listener>
    <listener-class>org.springframework.web.context.ContextLoaderListener</listener-class>
  </listener>

  <!--   springMVC -->
  <servlet>
    <servlet-name>springMvc</servlet-name>
    <servlet-class>org.springframework.web.servlet.DispatcherServlet</servlet-class>
    <init-param>
      <param-name>contextConfigLocation</param-name>
      <param-value>classpath:springMvc-servlet.xml</param-value>
    </init-param>
    <load-on-startup>1</load-on-startup>
  </servlet>
<!--/ 匹配所有的请求;(不包括.jsp)-->
<!--/* 匹配所有的请求;(包括.jsp)-->
  <servlet-mapping>
    <servlet-name>springMvc</servlet-name>
    <url-pattern>/</url-pattern>
  </servlet-mapping>

  <!--     解决post乱码 -->
  <filter>
    <filter-name>CharacterEncodingFilter</filter-name>
    <filter-class>org.springframework.web.filter.CharacterEncodingFilter</filter-class>
    <init-param>
      <param-name>encoding</param-name>
      <param-value>utf-8</param-value>
    </init-param>
  </filter>
  <filter-mapping>
    <filter-name>CharacterEncodingFilter</filter-name>
    <url-pattern>/*</url-pattern>
  </filter-mapping>

</web-app>
|
3配置springmvc-servlet.xml核心文件
只是在案例中使用。
 1
 2
 3
 4
 5
 6
 7
 8
 9
10
11
12
13
14
15
16
17
18
19
20
|
<?xml version="1.0" encoding="UTF-8"?>
<beans xmlns="http://www.springframework.org/schema/beans"
       xmlns:xsi="http://www.w3.org/2001/XMLSchema-instance"
       xmlns:context="http://www.springframework.org/schema/context"
       xsi:schemaLocation="http://www.springframework.org/schema/beans
        http://www.springframework.org/schema/beans/spring-beans-3.0.xsd
        http://www.springframework.org/schema/context
        http://www.springframework.org/schema/context/spring-context-3.0.xsd">
<!--处理器映射器 HandelMapping-->
<bean class="org.springframework.web.servlet.handler.BeanNameUrlHandlerMapping"></bean>
    <!--处理器适配器HandelAdapter-->
<bean class="org.springframework.web.servlet.mvc.SimpleControllerHandlerAdapter"></bean>
    <!--视图解析器ViewResolver-->
<bean class="org.springframework.web.servlet.view.InternalResourceViewResolver">
    <property name="prefix" value="/WEB-INF/jsp/"></property>
    <property name="suffix" value=".jsp"></property>
</bean>
<!--扫描包-->
 <context:component-scan base-package="com.lx.*"/>
</beans>
|
4java类 实现Controller接口
 1
 2
 3
 4
 5
 6
 7
 8
 9
10
|
@Component("/hello")//这里是把HelloController交给Spring管理,实际开发是设置Mapping,而不是实现接口
public class HelloController implements Controller {
    @Override
    public ModelAndView handleRequest(HttpServletRequest request, HttpServletResponse response) throws Exception {
        System.out.println("asdasdasdd==========");
        ModelAndView mv=new ModelAndView();
        mv.setViewName("hello");
        return mv;
    }
}
|
3执行流程
执行原理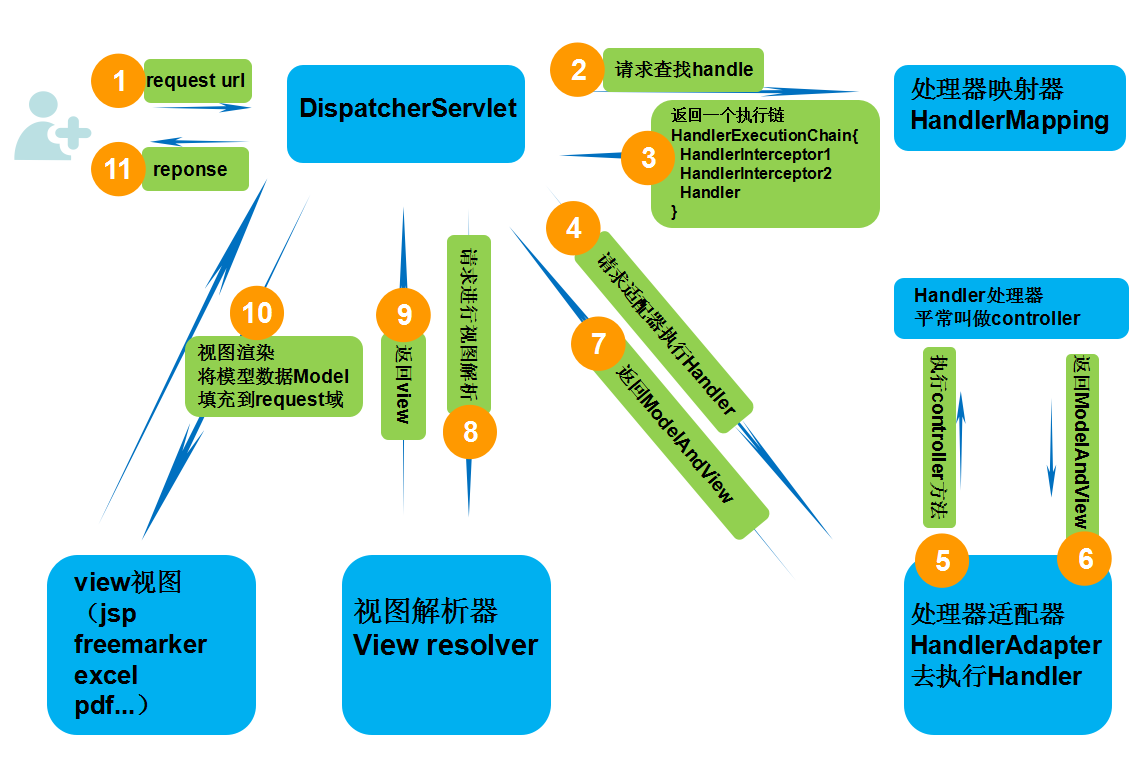
1 用户发起请求到前端控制器(DispatcherServlet)
2 前端控制器请求HandlerMapping查找 Handler (可以根据xml配置、注解进行查找)
3 处理器映射器HandlerMapping,找到Handler后映射为一个处理链HandlerExecutionChain(包含一个Handler,多个HandlerInterceptor拦截器对象)
4 前端控制器调用处理器适配器去执行Handler
5:处理器适配器HandlerAdapter将会根据适配的结果去执行Handler
6:Handler执行完成给适配器返回ModelAndView
7:处理器适配器向前端控制器返回ModelAndView (ModelAndView是springmvc框架的一个底层对象,包括 Model和view)
8:前端控制器请求视图解析器去进行视图解析 (根据逻辑视图名解析成真正的视图(jsp)),通过这种策略很容易更换其他视图技术,只需要更改视图解析器即可
9:视图解析器向前端控制器返回View
10:前端控制器进行视图渲染 (视图渲染将模型数据(在ModelAndView对象中)填充到request域)
11:前端控制器向用户响应结果
工作流程:
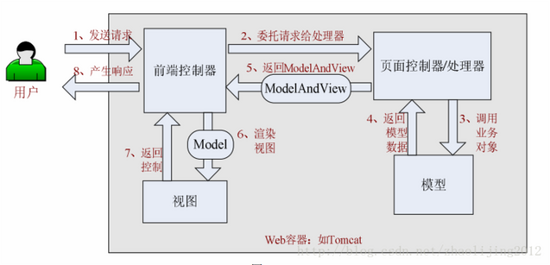
用户发起请求到前端控制器,前端控制器根据请求url找到Controller去执行,会返回一个ModelAndView,然后前端控制器根据,ModelAndView去视图解析器查找页面,再响应给用户。
第二章-MVC注解
1基于注解的案例
在上面的入门案例中,使用的是Implement接口,比较繁琐。
1.1pom.xml
 1
 2
 3
 4
 5
 6
 7
 8
 9
10
11
12
13
14
15
16
17
18
19
20
21
22
23
|
<?xml version="1.0" encoding="UTF-8"?>
<project xmlns="http://maven.apache.org/POM/4.0.0" xmlns:xsi="http://www.w3.org/2001/XMLSchema-instance"
  xsi:schemaLocation="http://maven.apache.org/POM/4.0.0 http://maven.apache.org/xsd/maven-4.0.0.xsd">
  <modelVersion>4.0.0</modelVersion>

  <properties>
    <project.build.sourceEncoding>UTF-8</project.build.sourceEncoding>
    <maven.compiler.source>1.8</maven.compiler.source>
    <maven.compiler.target>1.8</maven.compiler.target>
    <!--做一个统一版本号的设置 避免因为jar包冲突产生错误。 相当于创建了一个变量。-->
    <spring-version>5.1.5.RELEASE</spring-version>
  </properties>

<dependencies>
  <!--加入SpringMVC依赖,${spring-version}为了统一版本而新建的变量-->
  <dependency>
    <groupId>org.springframework</groupId>
    <artifactId>spring-webmvc</artifactId>
    <version>${spring-version}</version>
  </dependency>
</dependencies>

</project>
|
1.2web.xml
 1
 2
 3
 4
 5
 6
 7
 8
 9
10
11
12
13
14
15
16
17
18
19
20
21
22
23
24
25
26
27
28
29
30
31
32
33
34
35
36
37
38
39
40
41
42
43
44
45
46
47
48
49
50
|
<?xml version="1.0" encoding="UTF-8"?>
<web-app xmlns:xsi="http://www.w3.org/2001/XMLSchema-instance"
         xmlns="http://java.sun.com/xml/ns/javaee"
         xsi:schemaLocation="http://java.sun.com/xml/ns/javaee http://java.sun.com/xml/ns/javaee/web-app_2_5.xsd"
         version="2.5">
  <display-name>Archetype Created Web Application</display-name>
  <!--   spring监听 可以不配置spring监听(不知道为原因) -->
  <context-param>
    <param-name>contextConfigLocation</param-name>
    <param-value>classpath:applicationContext.xml</param-value>
  </context-param>
  <listener>
    <listener-class>org.springframework.web.context.ContextLoaderListener</listener-class>
  </listener>

  <!--   springMVC -->
  <servlet>
    <servlet-name>springMvc</servlet-name>
    <servlet-class>org.springframework.web.servlet.DispatcherServlet</servlet-class>
    <init-param><!--告诉服务器加载配置文件的地址 load-on-startup是和服务器一起启动。数字越小,启动越早-->
      <param-name>contextConfigLocation</param-name>
      <param-value>classpath:springMvc-servlet.xml</param-value>
    </init-param>
    <load-on-startup>1</load-on-startup>
  </servlet>
<!--/ 匹配所有的请求;(不包括.jsp)-->
<!--/* 匹配所有的请求;(包括.jsp)-->
  <servlet-mapping>
    <servlet-name>springMvc</servlet-name>
    <url-pattern>/</url-pattern>
  </servlet-mapping>

  <!--     解决post乱码 -->
  <filter>
    <filter-name>CharacterEncodingFilter</filter-name>
    <filter-class>org.springframework.web.filter.CharacterEncodingFilter</filter-class>
    <init-param>
      <param-name>encoding</param-name>
      <param-value>utf-8</param-value>
    </init-param>
  </filter>
  <filter-mapping>
    <filter-name>CharacterEncodingFilter</filter-name>
    <url-pattern>/*</url-pattern>
  </filter-mapping>
<!--Session过期时间-->
    <session-config>
        <session-timeout>15</session-timeout>
    </session-config>
</web-app>
|
1.3springMvc.xml
准确的应该是classpath:springMvc-servlet.xml,以这个为名称的配置文件。在我们进行整合时,可以写applicationContext.xml然后用标签导入其他配置文件,这样让结构更清晰。
部分关键标签解释:
<mvc:annotation-driven />开启注解驱动 启用Spring MVC注解
相当于注册1DefaultAnnotationHandlerMapping
2AnnotationMethodHandlerMapping
资源释放方式一:<mvc:default-servlet-handler />释放静态资源 默认servlet配置。会在Spring MVC上下文中定义一个org.springframework.web.servlet.resource.DefaultServletHttpRequestHandler,它会像一个检查员,对进入DispatcherServlet的URL进行筛查,如果发现是静态资源的请求,就将该请求转由Web应用服务器默认的Servlet处理,如果不是静态资源的请求,才由DispatcherServlet继续处理
资源释放方式二:<mvc:resources />允许静态资源放在任何地方。允许静态资源放在任何地方,如WEB-INF目录下、类路径下等,你甚至可以将JavaScript等静态文件打到JAR包中。通过location属性指定静态资源的位置,由于location属性是Resources类型,因此可以使用诸如"classpath:“等的资源前缀指定资源位置。传统Web容器的静态资源只能放在Web容器的根路径下,<mvc:resources />完全打破了这个限制。
例如:
1
2
|
<mvc:resources location="/bootstrap-3.3.5/" mapping="/bootstrap-3.3.5/**"></mvc:resources >
<mvc:resources location="/js/" mapping="/js/**)"></mvc:resources >
|
jsp使用时:src="${pageContext.request.ContextPath}/lib/jquery/js” 可以加入pageContext.request.ContextPath用来获得项目名
 1
 2
 3
 4
 5
 6
 7
 8
 9
10
11
12
13
14
15
16
17
18
19
20
21
22
23
24
25
26
27
28
29
30
31
32
33
34
35
36
37
|
<?xml version="1.0" encoding="UTF-8"?>
<beans xmlns="http://www.springframework.org/schema/beans"
       xmlns:xsi="http://www.w3.org/2001/XMLSchema-instance"
       xmlns:context="http://www.springframework.org/schema/context"
       xmlns:mvc="http://www.springframework.org/schema/mvc"
       xsi:schemaLocation="http://www.springframework.org/schema/beans
    http://www.springframework.org/schema/beans/spring-beans.xsd
    http://www.springframework.org/schema/context
    http://www.springframework.org/schema/context/spring-context.xsd
    http://www.springframework.org/schema/mvc
    https://www.springframework.org/schema/mvc/spring-mvc.xsd">

    <!-- 配置SpringMVC -->
    <!-- 1.开启SpringMVC注解驱动 -->
    <mvc:annotation-driven />

    <!-- 2.释放静态资源 默认servlet配置
方式一:<mvc:default-servlet-handler/> 将静态资源的处理经由Spring MVC框架交回Web应用服务器处理
方式二:<mvc:resources />允许静态资源放在任何地方
-->
    <mvc:default-servlet-handler/>

    <!-- 3.配置jsp 显示ViewResolver视图解析器
	 <property name="prefix" value="/WEB-INF/jsp/" />
	prefix value设置的是webapp下的路径,比如,"/view/"就是webapp/view下的

-->
    <bean class="org.springframework.web.servlet.view.InternalResourceViewResolver">
        <property name="viewClass" value="org.springframework.web.servlet.view.JstlView" />
        <property name="prefix" value="/WEB-INF/jsp/" />
        <property name="suffix" value=".jsp" />
    </bean>

    <!-- 4.扫描web相关的bean -->
    <context:component-scan base-package="com.kuang.controller" />

</beans>
|
1.4java类Controller
推荐使用ModelAndView。进行数据回显
 1
 2
 3
 4
 5
 6
 7
 8
 9
10
|
@RequestMapping(value="/edit")
	public ModelAndView edit(HttpServletRequest request) {
		Staff staff=new Staff();
		Account account=new Account();
		staff.setAccount(account);
		ModelAndView mv=new ModelAndView();
		mv.setViewName("edit");
		mv.addObject("staff",staff);
		return mv;
	}
|
使用json返回String字符串,汉字会乱码,建议为集合
1
2
3
|
//若json返回值乱码,加上produces
@RequestMapping(value="readReceiveInfo",produces="text/html;charset=UTF-8")
|
1.5转发和重定向
当return时,想要跳转的话(不请求jsp),加上"redirect:”
//转发 return “index”;
//转发二 return “forward:index”;
//重定向 return “redirect:index”;
注意不加.jsp,是重定向到Controller的
重定向到Controller注意:
return “redirect:/mpCardtype/showMpCardtype”;
redirect:后有正斜杠/,表明使用绝对路径(建议)。否则使用相对路径。
2主要注解
这些注解不另起节点解释。
-
@Controller 告诉Spring表明是一个Controller,相当注册Bean
-
@RequestMapping(value=”/HelloController”,method=RequestMethod.GET,params="属性名!=xx/属性名称=xx/属性名”),用来窄化,请求路径可以用在类上,可以用在方法上。method用来限定请求方式,不设置则任意请求都可以。
params属性可以用来限制某个属性值,属性值不等于/某属性值等于/某属性必须存在,才进行处理。
-
@PathVariable 用于取出Result风格的值,详情见下面Result风格介绍。
-
@RequestParam(value="password”,required = true) String password 用在Controller方法的请求参数上
可以用来设置请求参数的名称(解决jsp中name名和参数名不一致的问题。)
required=true设置必须和非必须。注意的是:当jsp页面有这个name时,即使表单中没有输入,这个参数的值为"“而不是Null,所以required的含义是,jsp页面必须有这个name。
不常用的注解:
- @CookieValue(value="JSESSIONID1”,required = false) String session;
用来取出Cookie的值,value是cookie的键,required默认为true。
- @RequestHeader(value = “User-Agent”)String header
用在方法参数前,获得请求头的值,若不存在会报错,和cookieValue一样,有required。
3传递参数
若请求参数为对象,比如在JSP页面中 name="user.name”,那么在Controller中可以直接用User user进行接收,若其中还有对象,user.account.password就可以。
也可以直接使用name
在添加多个相同对象时候,数据使用数组,除非表单中name=age ,
参数列表没有age,数组为Null,否则age[]是一个长度为0的数组,所以在添加时需要判断age.length>0,否则会报空指针。
参数问题
在使用文件上传时,文件参数名称不管有无都为null(只要没传文件)。
5异常处理
全局异常处理编写controllerAdvice
若只针对一个controller编写 则只添加@ExceptionHandler注解方法就好
 1
 2
 3
 4
 5
 6
 7
 8
 9
10
11
12
13
|
@ControllerAdvice
public class ExceptionController {

    //异常处理方法
    @ExceptionHandler
    public ModelAndView handException(Exception ex) {
    	System.err.println("出现异常"+ex);
    	ModelAndView mv=new ModelAndView();
    	mv.setViewName("exception");
    	mv.addObject("exception",ex);

    	return mv;
    }
|
编写jsp页面,添加isErrorPage="true”
 1
 2
 3
 4
 5
 6
 7
 8
 9
10
11
12
13
14
15
16
17
18
19
|
<%@ page language="java" contentType="text/html; charset=UTF-8"
    pageEncoding="UTF-8" isErrorPage="true"%>
<%@ taglib prefix="c" uri="http://java.sun.com/jsp/jstl/core" %>
<%
String path = request.getContextPath();
String basePath = request.getScheme()+"://"+request.getServerName()+":"+request.getServerPort()+path+"/";
%>
<!DOCTYPE html>
<html>
<head>
<meta charset="UTF-8">
<meta name="viewport" content="width=device-width,initial-scale=1" />
<title>Insert title here</title>
</head>
<body>
<h1>您的页面走丢了,请联系管理员,电话:110120119</h1>
${exception.message}
</body>
</html>
|
第三章-MVC功能
1日期类型转换
默认为:2020-07-16T07:45:46.472Z
若是使用的JSON @JsonFormat(pattern="yyyy-MM-dd HH:mm:ss", timezone = "GMT+8")
还可以通过在实体类时间字段上面添加 @DateTimeFormat(pattern="yyyy-MM-dd HH:mm:ss")
也可以在Controller中添加@DateTimeFormat(pattern = "yyyy-MM-dd HH:mm:ss") Date begin
1传给后台转换时间 两种方式
方式一:实现接口
 1
 2
 3
 4
 5
 6
 7
 8
 9
10
11
12
13
14
15
|
public class DateConverter implements Converter<String,Date>{
//字符串转为日期
	@Override
	public Date convert(String source) {
		SimpleDateFormat sf=new SimpleDateFormat("yyyy-MM-dd");
		try {
			sf.setLenient(false);//是否宽松解析 默认为true宽松解析(dd可以等于32)
			Date date=sf.parse(source);
			return date;
		} catch (ParseException e) {
			e.printStackTrace();
			return null;
		}
	}
}
|
 1
 2
 3
 4
 5
 6
 7
 8
 9
10
11
12
13
14
15
16
|
<!-- 配置自定义类型转换器 -->
<bean id="conversionService"  class="org.springframework.context.support.ConversionServiceFactoryBean" >
<property name="converters">
<set>
<bean class="com.lx.test.DateConverter"></bean>
<bean class="com.lx.test.DateArrayConverter"></bean>
</set>
</property>
</bean>

<!-- 配置注解驱动  启用Spring MVC注解
相当于注册1DefaultAnnotationHandlerMapping
2AnnotationMethodHandlerMapping
-->
conversionService是上面的id
<mvc:annotation-driven conversion-service="conversionService" />
|
方式二:使用注解
1
2
3
4
5
6
7
|
public interface DateConverter {
	  @InitBinder //字符串转为日期
	  static void initBinder(HttpServletRequest request,ServletRequestDataBinder binder)throws Exception { SimpleDateFormat
	  format=new SimpleDateFormat("yyyy-MM-dd HH:mm:ss");
	  format.setLenient(false);//仁慈的 --否  是否允许日期32天类似的。
	  binder.registerCustomEditor(Date.class,new CustomDateEditor(format, true)); }
}
|
去spring.xml中配置。
2显示到jsp等页面
1
2
|
<%@ taglib prefix="fmt" uri= "http://java.sun.com/jsp/jstl/fmt"%>
< fmt:formatDate value= "${staff.birth }"pattern= "yyy-MM-dd HH:mm:ss"/>
|
2拦截器
拦截器只会拦截Controller

SpringMVC-Servlet.xml配置
 1
 2
 3
 4
 5
 6
 7
 8
 9
10
|
<!-- 配置拦截器 可以配置多个 按顺序执行 -->
<mvc:interceptors>
	<mvc:interceptor>
<!-- 	表示要拦截的方法  拦截所有:path="/**"  拦截部分:"/user/*"
			表示不拦截的方法	<mvc:exclude-mapping path=""/>
 -->
	<mvc:mapping path="/**"/>
		<bean class="com.lx.interceptor.myInterceptor"></bean>
	</mvc:interceptor>
</mvc:interceptors>
|
拦截器实现方式一:实现HandlerInterceptor接口
 1
 2
 3
 4
 5
 6
 7
 8
 9
10
11
12
13
14
15
16
17
18
19
20
21
22
23
24
|
public class myInterceptor implements HandlerInterceptor {
	//执行Handle之前执行,身份校验,权限认证
	@Override
	public boolean preHandle(HttpServletRequest request, HttpServletResponse response, Object handler)
			throws Exception {
		System.out.println("执行handle方法之前");
		return HandlerInterceptor.super.preHandle(request, response, handler);
	}
	// 执行Handle时候,返回ModelAndView前执行
	//向页面提供公共数据
	@Override
	public void postHandle(HttpServletRequest request, HttpServletResponse response, Object handler,
			ModelAndView modelAndView) throws Exception {
		System.out.println("执行Handle时候,返回ModelAndView前执行");
		HandlerInterceptor.super.postHandle(request, response, handler, modelAndView);
	}
	@Override
	public void afterCompletion(HttpServletRequest request, HttpServletResponse response, Object handler, Exception ex)
			throws Exception {
		System.out.println("执行handle方法之后");//释放资源
		HandlerInterceptor.super.afterCompletion(request, response, handler, ex);
	}

}
|
实现方式二继承:继承HandlerInterceptorAdapter类
 1
 2
 3
 4
 5
 6
 7
 8
 9
10
11
12
13
14
15
16
17
18
19
20
21
|
public class LoginInterceptor extends HandlerInterceptorAdapter  {

	@Override
	public boolean preHandle(HttpServletRequest request, HttpServletResponse response, Object handler)
			throws Exception {
			String  name=request.getContextPath();//获得项目名称 /springmvc3-multiple
		    String path=request.getServletPath();//获得请求路径  /login/toIndex
		     String url=request.getRequestURI();//获得访问 url /springmvc3-multiple/login/toIndex
		    System.out.println("  getContextPath():"+name+"  ||  getServletPath():"+path+" ||   requestURL:"+url);

		    if(url.indexOf("/login")>=0) {
		    	return true;
		    }
		    Object obj=request.getSession().getAttribute("user");
		    if(obj !=null) {
		    	return true;
		    }
		    response.sendRedirect(name+"/login/toLogin");
		return false;
	}
|
3文件上传/下载
需要加入jiar包
1
2
3
4
5
6
|
<!-- 	文件上传 -->
<dependency>
    <groupId>commons-fileupload</groupId>
    <artifactId>commons-fileupload</artifactId>
    <version>1.3.3</version>
</dependency>
|
3.1上传
1springmvc.xml
1
2
3
4
|
<bean id="multipartResolver" class="org.springframework.web.multipart.commons.CommonsMultipartResolver">
<property name="maxUploadSize" value="10000000000"></property>
<property name="defaultEncoding" value="UTF-8"></property>
</bean>
|
2jsp
- form表单的enctype取值必须是: enctype="multipart/form-data”
(默认值是:application/x-www- form-urlencoded)
enctype :是表单请求正文的类型
enctype不是application时,gatParameter会失效
- method属性取值必须是Post,提供一个文件选择域
<input type="file" />
3controller保存文件
portraitFile.getSize()<=0可以用来判断是否上传文件。
infoFile.isEmpty()也可以判断是否上传文件。
 1
 2
 3
 4
 5
 6
 7
 8
 9
10
11
12
13
14
15
16
17
18
19
|
	@RequestMapping(value="/upload")
	public String fileUpLoad(@RequestParam(value="file",required =true ) MultipartFile file,String name,HttpServletRequest request) {
	String path=request.getServletContext().getRealPath("/imgs");//获得路径 webapp下的imgs

	String fileName=file.getOriginalFilename();//获得文件名称
	String lastName=fileName.substring(fileName.indexOf("."));//获得文件后缀 .img

	String uuid=UUID.randomUUID().toString().replace("-", "");//生成uuid
	String newName=uuid+lastName;//最后路径 可以保存到数据库

	System.out.println(path+"\\"+newName);
		try {
			FileUtils.copyInputStreamToFile(file.getInputStream(),new File(path+"/"+newName));
																											//也可new File(path,newFileName)
		} catch (IOException e) {
			e.printStackTrace();
		}
		return "index";
	}
|
3.2下载
 1
 2
 3
 4
 5
 6
 7
 8
 9
10
11
12
|
	@RequestMapping("/download")
	public void downLoad( @RequestParam(value="fileName")String filename,HttpServletRequest req, HttpServletResponse resp) throws Exception {
		String realPath = req.getServletContext().getRealPath("/imgs");//获取下载文件的路径
		File file = new File(realPath, filename);//把下载文件构成一个文件处理   filename:前台传过来的文件名称

		//设置下载时文件的显示类型(即文件名称-后缀)   ex:txt为文本类型
		resp.setHeader("Content-Disposition", "attachment;filename=" + filename);
		//下载文件:将一个路径下的文件数据转到一个输出流中,也就是把服务器文件通过流写(复制)到浏览器端

		Files.copy(file.toPath(), resp.getOutputStream());//Files.copy(要下载的文件的路径,响应的输出流)
		//FileUtils.copyFile(file, resp.getOutputStream());都可以
	}
|
下载静态资源
 1
 2
 3
 4
 5
 6
 7
 8
 9
10
11
|
@RequestMapping(value="/downLoad",method = RequestMethod.GET)
public void donLoad(HttpServletRequest request,HttpServletResponse response)throws Exception {
	String realPath="E:\\ttttt/file.zip";//window下载文件的路
	//String realPath="/www/file.zip";//linux下载文件的路径

  File file=new File(realPath);
  //加上下面这个可以有提示框框
  response.setHeader("Content-Disposition","attachment;filename="+file.getName());

	  Files.copy(file.toPath(), response.getOutputStream());
  }
|
3.3eclise中的路径
获得访问路径

1加上标签<%@taglib uri="http://www.springframework.org/tags/form” prefix="form”%>
 1
 2
 3
 4
 5
 6
 7
 8
 9
10
11
12
13
14
15
16
17
18
19
20
21
22
|
<h1>form表单</h1>
<form:form action="${pageContext.request.contextPath}/staff/updateStaff"
modelAttribute="staff"  method="post" enctype="multipart/form-data">
portrait:<img src="${pageContext.request.contextPath}/imgs/${staff.portrait}" width="80px" height="80px"><br>
<input type="file" name="portraitFile" >
<form:input path="portrait"/>
	id:<form:input  path="id" /><br>
	name:<form:input path="name" /><br>
	age:<form:input  path="age" /><br>
	birth:<form:input path="birth"/><br>
	department:
	<form:select path="department">
		<form:option value="">=请选择=</form:option>
		<form:options items="${depts}" itemLabel="dname" itemValue="did" />
	</form:select>

	account.aid:<form:input path="account.aid" /><br>
	account.account:<form:input path="account.account" /><br>
	account.password<form:input  path="account.password" /><br>
	account.status<form:input path="account.status" />
	<button>提交</button>
</form:form>
|
5AJAX使用
1加入依赖jackson-databind、jackson-core和jackson-annotations
添加一个依赖jackson-databind就可以拥有这三个jar包
1
2
3
4
5
6
|
<!-- 使用jackson  也可以使用gson -->
<dependency>
    <groupId>com.fasterxml.jackson.core</groupId>
    <artifactId>jackson-databind</artifactId>
    <version>2.10.1</version>
</dependency>
|
2Controller中使用
 1
 2
 3
 4
 5
 6
 7
 8
 9
10
|
@RequestMapping(value="/checkAccount")
	@ResponseBody
	public Map<String,Boolean> checkAccount(String account) {
		System.out.println("=进入登陆 开始检查=");
		boolean s=staffDao.findByAccountParam(account);
		Map<String,Boolean> map=new HashMap<String,Boolean>();
		map.put("valid",!s);//valid有效的 若为null返回false 此时有效
		System.out.println("=离开登陆 结束检查=");
		return map;
	} //也可以返回List
|
3当Ajax使用,想要忽略某些值时候。
方式一:@JsonIgnoreProperties(“name”,“password”) 用在类上面,用于在序列化时忽略指定字段
方式二:@JsonIgnore 用在属性上面,用于序列化时忽略该属性
4对时间类型转换。
@JsonFormat 用在Date时间类型属性上面,用于序列化时间为需要的格式。
@JsonFormat ( pattern= “yyyy-MM-dd HH:mm:ss”, time zone= “GMT+8” )