面试题一览
第一章-Swagger概述
1什么是Swagger
前后端分离
- 前端 -> 前端控制层、视图层
- 后端 -> 后端控制层、服务层、数据访问层
- 前后端通过API进行交互
- 前后端相对独立且松耦合
产生的问题
解决方案
- 首先定义schema [ 计划的提纲 ],并实时跟踪最新的API,降低集成风险
Swagger
- 号称世界上最流行的API框架
- Restful Api 文档在线自动生成器 => API 文档 与API 定义同步更新
- 直接运行,在线测试API
- 支持多种语言 (如:Java,PHP等)
- 官网:https://swagger.io/
2SpringBoot集成Swagger
SpringBoot集成Swagger => springfox,两个jar包
- Springfox-swagger2
- swagger-springmvc
使用Swagger
要求:jdk 1.8 + 否则swagger2无法运行
2、添加Maven依赖
 1
 2
 3
 4
 5
 6
 7
 8
 9
10
11
12
|
<!-- https://mvnrepository.com/artifact/io.springfox/springfox-swagger2 -->
<dependency>
   <groupId>io.springfox</groupId>
   <artifactId>springfox-swagger2</artifactId>
   <version>2.9.2</version>
</dependency>
<!-- https://mvnrepository.com/artifact/io.springfox/springfox-swagger-ui -->
<dependency>
   <groupId>io.springfox</groupId>
   <artifactId>springfox-swagger-ui</artifactId>
   <version>2.9.2</version>
</dependency>
|
3、编写HelloController,测试确保运行成功!
4、要使用Swagger,我们需要编写一个配置类-SwaggerConfig来配置 Swagger
1
2
3
4
|
@Configuration //配置类
@EnableSwagger2// 开启Swagger2的自动配置
public class SwaggerConfig {
}
|
5、访问测试 :http://localhost:8080/swagger-ui.html ,可以看到swagger的界面;
3Swagger配置
1、Swagger实例Bean是Docket,所以通过配置Docket实例来配置Swaggger。
1
2
3
4
5
6
7
8
9
|
@Configuration
@EnableSwagger2
public class SwaggerConfig {
    @Bean //配置docket以配置Swagger具体参数
    public Docket docket() {
    //    return new Docket(DocumentationType.SWAGGER_2);
          return new Docket(DocumentationType.SWAGGER_2).apiInfo(apiInfo());
    }
}
|
2、可以通过apiInfo()属性配置文档信息
 1
 2
 3
 4
 5
 6
 7
 8
 9
10
11
12
13
14
|
//配置文档信息
private ApiInfo apiInfo() {
   Contact contact = new Contact("联系人名字", "http://xxx.xxx.com/联系人访问链接","联系人邮箱");
   return new ApiInfo(
           "Swagger学习", // 标题
           "学习演示如何配置Swagger", // 描述
           "v1.0", // 版本
           "http://terms.service.url/组织链接", // 组织链接
           contact, // 联系人信息
           "Apach 2.0 许可", // 许可
           "许可链接", // 许可连接
           new ArrayList<>()// 扩展
  );
}
|
3、Docket 实例关联上 apiInfo()
1
2
3
4
|
@Bean
public Docket docket() {
   return new Docket(DocumentationType.SWAGGER_2).apiInfo(apiInfo());
}
|
4、重启项目,访问测试 http://localhost:8080/swagger-ui.html 看下效果;
4配置扫描接口
1、构建Docket时通过select()方法配置怎么扫描接口。(主要使用这个方式就好)
1
2
3
4
5
6
7
8
|
@Bean
public Docket docket() {
   return new Docket(DocumentationType.SWAGGER_2)
      .apiInfo(apiInfo())
      .select()// 通过.select()方法,去配置扫描接口,RequestHandlerSelectors配置如何扫描接口
      .apis(RequestHandlerSelectors.basePackage("com.kuang.swagger.controller"))
      .build();
}
|
2、重启项目测试,由于我们配置根据包的路径扫描接口,所以我们只能看到一个类
3、除了通过包路径配置扫描接口外,还可以通过配置其他方式扫描接口,这里注释一下所有的配置方式:
1
2
3
4
5
6
7
8
|
any() // 扫描所有,项目中的所有接口都会被扫描到
none() // 不扫描接口
// 通过方法上的注解扫描,如withMethodAnnotation(GetMapping.class)只扫描get请求
withMethodAnnotation(final Class<? extends Annotation> annotation)

// 通过类上的注解扫描,如.withClassAnnotation(Controller.class)只扫描有controller注解的类中的接口
withClassAnnotation(final Class<? extends Annotation> annotation)
basePackage(final String basePackage) // 根据包路径扫描接口
|
4、除此之外,我们还可以配置接口扫描过滤:
 1
 2
 3
 4
 5
 6
 7
 8
 9
10
|
@Bean
public Docket docket() {
   return new Docket(DocumentationType.SWAGGER_2)
      .apiInfo(apiInfo())
      .select()// 通过.select()方法,去配置扫描接口,RequestHandlerSelectors配置如何扫描接口
      .apis(RequestHandlerSelectors.basePackage("com.kuang.swagger.controller"))
       // 配置如何通过path过滤,即这里只扫描请求以/kuang开头的接口
      .paths(PathSelectors.ant("/kuang/**"))
      .build();
}
|
5、paths的可选值还有
1
2
3
4
|
any() // 任何请求都扫描
none() // 任何请求都不扫描
regex(final String pathRegex) // 通过正则表达式控制
ant(final String antPattern) // 通过ant()控制
|
 1
 2
 3
 4
 5
 6
 7
 8
 9
10
11
12
|
//多个troller 没有实际运用
{
 com.google.common.base.Predicate<RequestHandler> selector1 = RequestHandlerSelectors.basePackage("com.share.modules.user.controller");
 com.google.common.base.Predicate<RequestHandler> selector2 = RequestHandlerSelectors.basePackage("com.share.modules.resource.controller");
    return new Docket(DocumentationType.SWAGGER_2)
            .apiInfo(apiInfo())
            .select()
            .apis(Predicates.or(selector1,selector2))
            .paths(PathSelectors.any())
            .build()
            .globalOperationParameters(setHeaderToken());
}
|
5配置Swagger开关
1、通过enable()方法配置是否启用swagger,如果是false,swagger将不能在浏览器中访问了
 1
 2
 3
 4
 5
 6
 7
 8
 9
10
11
|
@Bean
public Docket docket() {
   return new Docket(DocumentationType.SWAGGER_2)
      .apiInfo(apiInfo())
      .enable(false) //配置是否启用Swagger,如果是false,在浏览器将无法访问
      .select()// 通过.select()方法,去配置扫描接口,RequestHandlerSelectors配置如何扫描接口
      .apis(RequestHandlerSelectors.basePackage("com.kuang.swagger.controller"))
       // 配置如何通过path过滤,即这里只扫描请求以/kuang开头的接口
      .paths(PathSelectors.ant("/kuang/**"))
      .build();
}
|
2、如何动态配置当项目处于test、dev环境时显示swagger,处于prod时不显示?
需要配置多个环境,见springboot配置
 1
 2
 3
 4
 5
 6
 7
 8
 9
10
11
12
13
14
15
16
17
|
@Bean
public Docket docket(Environment environment) {
   // 设置要显示swagger的环境
   Profiles of = Profiles.of("dev", "test");
   // 判断当前是否处于该环境
   // 通过 enable() 接收此参数判断是否要显示
   boolean b = environment.acceptsProfiles(of);

   return new Docket(DocumentationType.SWAGGER_2)
      .apiInfo(apiInfo())
      .enable(b) //配置是否启用Swagger,如果是false,在浏览器将无法访问
      .select()// 通过.select()方法,去配置扫描接口,RequestHandlerSelectors配置如何扫描接口
      .apis(RequestHandlerSelectors.basePackage("com.kuang.swagger.controller"))
       // 配置如何通过path过滤,即这里只扫描请求以/kuang开头的接口
      .paths(PathSelectors.ant("/kuang/**"))
      .build();
}
|
3、可以在项目中增加一个dev的配置文件查看效果!
6配置API分组
==可以设置不同的controller为不同的分组==

1、如果没有配置分组,默认是default。通过groupName()方法即可配置分组:
1
2
3
4
5
6
|
@Bean
public Docket docket(Environment environment) {
   return new Docket(DocumentationType.SWAGGER_2).apiInfo(apiInfo())
      .groupName("hello") // 配置分组
       // 省略配置....
}
|
2、重启项目查看分组
3、如何配置多个分组?配置多个分组只需要配置多个docket即可:
这样就可以查看各个不同的controller了
 1
 2
 3
 4
 5
 6
 7
 8
 9
10
11
12
|
@Bean
public Docket docket1(){
   return new Docket(DocumentationType.SWAGGER_2).groupName("group1");
}
@Bean
public Docket docket2(){
   return new Docket(DocumentationType.SWAGGER_2).groupName("group2");
}
@Bean
public Docket docket3(){
   return new Docket(DocumentationType.SWAGGER_2).groupName("group3");
}
|
4、重启项目查看即可
7实体配置
注意:实体类的配置只会在使用到的时候会出现,比如在controller中返回的类型值为这个实体。
1、新建一个实体类
写实体类value最好 加上类名
1
2
3
4
5
6
7
|
@ApiModel(value="用户实体",description="")
public class User {
   @ApiModelProperty("用户名")
   public String username;
   @ApiModelProperty("密码")
   public String password;
}
|
2、只要这个实体在请求接口的返回值上(即使是泛型),都能映射到实体项中:
1
2
3
4
|
@RequestMapping("/getUser")
public User getUser(){
   return new User();
}
|
3、重启查看测试
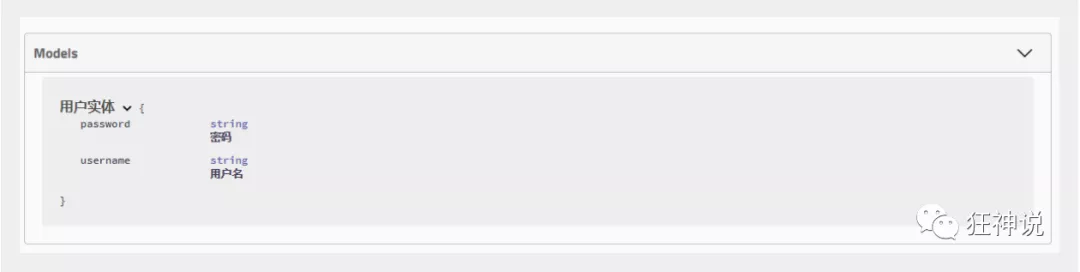
注:并不是因为@ApiModel这个注解让实体显示在这里了,而是只要出现在接口方法的返回值上的实体都会显示在这里,而@ApiModel和@ApiModelProperty这两个注解只是为实体添加注释的。
@ApiModel为类添加注释
@ApiModelProperty为类属性添加注释
8常用注解
Swagger的所有注解定义在io.swagger.annotations包下
作用范围 API 使用位置 对象属性 @ApiModelProperty 用在出入参数对象的字段上 协议集描述 @Api 用于controller类上 协议描述 @ApiOperation 用在controller的方法上 Response集 @ApiResponses 用在controller的方法上 Response @ApiResponse 用在 @ApiResponses里边 非对象参数集 @ApiImplicitParams 用在controller的方法上 非对象参数描述 @ApiImplicitParam 用在@ApiImplicitParams的方法里边 描述返回对象的意义 @ApiModel 用在返回对象类上
| 作用范围 |
API |
使用位置 |
| 对象属性 |
@ApiModelProperty |
用在出入参数对象的字段上 |
| 协议集描述 |
@Api |
用于controller类上 |
| 协议描述 |
@ApiOperation |
用在controller的方法上 |
| Response集 |
@ApiResponses |
用在controller的方法上 |
| Response |
@ApiResponse |
用在 @ApiResponses里边 |
| 非对象参数集 |
@ApiImplicitParams |
用在controller的方法上 |
| 非对象参数描述 |
@ApiImplicitParam |
用在@ApiImplicitParams的方法里边 |
| 描述返回对象的意义 |
@ApiModel |
用在返回对象类上 |
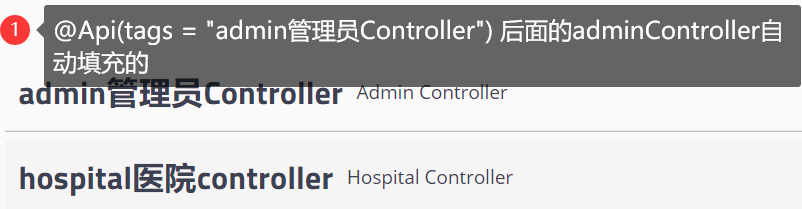
1Controller上的
| Swagger注解 |
简单说明 |
| 1@Api(tags = “api用途说明,用于分组”,value="接口描述”) |
作用在模块类上(请求类) |
| 2@ApiOperation(value="xxx接口方法说明”,notes="接口详细描述”,tags="选择已有分组,或新建”) |
作用在接口方法上(controller方法) |
| 3@ApiImplicitParams |
用于说明多个请求参数 |
| 4@ApiIgnore: 作用于接口入参参数列表 |
表示swagger忽略该入参 |
| 5@ApiParam(“xxx参数说明”)类似@ApiImplicitParams |
参数说明,和上面3用法类似 |
| 6@ApiResponse返回结果 |
|
在写mabatis代码时,有时实体类有级联实体的,这个实体又用在请求参数上,会造成文档参数的多余。所以,可以重写一个类,作为参数。
** 详解或例子**
1@ApiOperation
1
2
3
4
5
6
7
|
@ApiOperation
value:接口用途(必选) 直接在注解后括号内写,即value的值,会在swagger-ui里显示,具体示例如下
  notes:接口备注说明(可选)
  httpMethod:请求方式(可选)
  response:返回参数类型(可选)
  tags:接口分组名(可选)
  hidden:隐藏
|
2@Api的tags标签。用来分组,前面的大黑体字。
tags可以有多个参数{“分组1”,“分组2”}
3@ApiImplicitParams
 1
 2
 3
 4
 5
 6
 7
 8
 9
10
11
12
13
14
15
16
17
18
19
20
21
22
23
|
@ApiImplicitParams:(可选,当描述多个@ApiImlicitParam时使用),即描述多个参数的时候使用
   @ApiImplicitParam(
  接口入参描述,本身可选,对应的子字段也可选。
  name:参数属性名
  value:参数说明
  required:是否必传 true/false
  paramType:请求参数的获取方式
    header:@RequestHeader 从请求头获取
    query:@RequestParam 从请求参数获取
    path:@PathVariable 从请求的路径获取,这也是使用动态(REST风格)请求url的使用的注解
    body:@RequestBody 使用此注解,可以选择接收参数为对象类型(JSON)
    form:极少使用,请求表单中获取
  dataType:参数类型
  defaultValue:参数默认值,用swagger时会默认填充
)

@ApiImplicitParams( //用在请求参数,对请求参数进行说明
        @ApiImplicitParam(name = "id",
                value = "admin的主键Id value"
                ,defaultValue="201801"
                //required 可选参数
        )
)
|

6@ApiResponses
1
2
3
4
5
|
@ApiResponses:(接口返回结果;可选,当描述多个@ApiResponse时候使用)
  @ApiResponse:(可选)
    code:HTTP请求返回码。(必选)
    message:返回信息。(必选)
    response:返回类型,需使用全类名。eg:"com.xxx.dto.DemoRequestDTO.class"(可选)
|
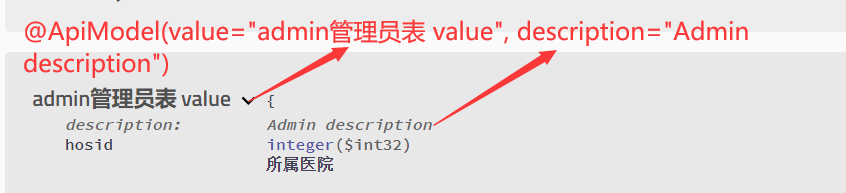
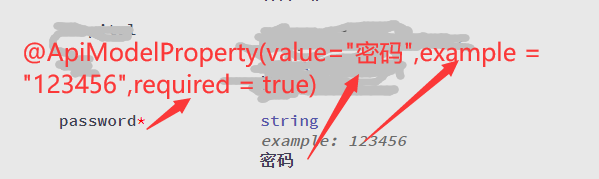
2实体类上面的
| Swagger注解 |
简单说明 |
| 1@ApiModel(value="xxxPOJO说明”,descrition=”") |
作用在模型类上:如VO、BO |
| 2@ApiModelProperty(value = “xxx属性说明”,hidden = true,required=true 参数是否必选,example–举例说明) |
作用在类方法和属性上,hidden设置为true可以隐藏该属性 |
|
|
1@ApiModel
2@ApiModelProperty
正式环境要记得关闭Swagger,一来出于安全考虑二来节省运行时内存。
3请求参数忽略
当一个实体类,级联操作时,那么就会有参数。
可以对参数使用@ApiIgnore注解,再用@ApiImplicitParam
 1
 2
 3
 4
 5
 6
 7
 8
 9
10
11
|
@ApiImplicitParams({
     @ApiImplicitParam(name = "page", value = "分页参数:当前页", defaultValue = "1", required = false),
     @ApiImplicitParam(name = "limit", value = "分页参数:每页数量", defaultValue = "10", required = false),
     @ApiImplicitParam(name = "loginname", value = "登录名称", required = false),
     @ApiImplicitParam(name = "loginip", value = "IP", required = false),
     @ApiImplicitParam(name = "startTime", value = "登录起始时间", required = false),
     @ApiImplicitParam(name = "endTime", value = "登录终止时间", required = false)
})
public Result page(@ApiIgnore LogVo vo) {
    return null;
}
|
9总结/风格
推荐前两个UI (可以有其它的ui,可以上网查询)
http://localhost:8080/swagger-ui.html
可以直接测试方法。
我们可以导入不同的包实现不同的皮肤定义:
1、默认的 访问 http://localhost:8080/swagger-ui.html
1
2
3
4
5
|
<dependency>
   <groupId>io.springfox</groupId>
   <artifactId>springfox-swagger-ui</artifactId>
   <version>2.9.2</version>
</dependency>
|
2、bootstrap-ui 可以把接口文档进行导出 访问 http://localhost:8080/doc.html
1
2
3
4
5
6
|
<!-- 引入swagger-bootstrap-ui包 /doc.html-->
<dependency>
   <groupId>com.github.xiaoymin</groupId>
   <artifactId>swagger-bootstrap-ui</artifactId>
   <version>1.9.1</version>
</dependency>
|
4、mg-ui 访问 http://localhost:8080/document.html
1
2
3
4
5
6
|
<!-- 引入swagger-ui-layer包 /document.html-->
<dependency>
   <groupId>com.zyplayer</groupId>
   <artifactId>swagger-mg-ui</artifactId>
   <version>1.0.6</version>
</dependency>
|
第二章-结合的技术
4Result风格
https://blog.kuangstudy.com/index.php/archives/466/
这里简单介绍一下,以后用到时再行补充。
Restful就是一个资源定位及资源操作的风格。不是标准也不是协议,只是一种风格。基于这个风格设计的软件可以更简洁,更有层次,更易于实现缓存等机制。
功能
- 资源:互联网所有的事物都可以被抽象为资源
- 资源操作:使用POST、DELETE、PUT、GET,使用不同方法对资源进行操作。
- 分别对应 添加、 删除、修改、查询。
传统方式操作资源 :通过不同的参数来实现不同的效果!方法单一,post 和 get
- http://127.0.0.1/item/queryItem.action?id=1 查询,GET
- http://127.0.0.1/item/saveItem.action 新增,POST
- http://127.0.0.1/item/updateItem.action 更新,POST
- http://127.0.0.1/item/deleteItem.action?id=1 删除,GET或POST
使用RESTful操作资源 : 可以通过不同的请求方式来实现不同的效果!如下:请求地址一样,但是功能可以不同!
- http://127.0.0.1/item/1 查询,GET
- http://127.0.0.1/item 新增,POST
- http://127.0.0.1/item 更新,PUT
- http://127.0.0.1/item/1 删除,DELETE
请求方法的注解,
@GetMapping 是 @RequestMapping(method =RequestMethod.GET) 的一个快捷方式。
@GetMapping @PostMapping @PutMapping @DeleteMapping @PatchMapping
在Spring MVC中可以使用 @PathVariable 注解,让方法参数的值对应绑定到一个URI模板变量上。
比如网页访问http://localhost:8080/commit/1/2,结果为3
 1
 2
 3
 4
 5
 6
 7
 8
 9
10
11
12
13
|
@Controller
public class RestFulController {

    //映射访问路径
    @RequestMapping("/commit/{p1}/{p2}")
    public String index(@PathVariable int p1, @PathVariable int p2, Model model){
        int result = p1+p2;
        //Spring MVC会自动实例化一个Model对象用于向视图中传值
        model.addAttribute("msg", "结果:"+result);
        //返回视图位置
        return "test";
    }
}
|